목차
- Spring Cloud Config: 소개와 예제
- Spring Cloud Config: Spring Cloud Bus 예제
- Spring Cloud Config: Git Webhook을 이용한 자동 갱신
- Spring Cloud Config: Spring Boot 2.4 버전에서의 변경사항
왜 Spring Cloud Config?
특정 확률에 따라 광고를 내보내는 기능을 개발한다고 하자. 그리고 확률 값의 변경될 때마다 수익이 어떻게 변하는지 확인해보는 A/B 테스트를 진행할 것이다. 예를 들면 처음에는 5%로 설정했다가 테스트가 끝난 후 다시 10%로 바꿔야 한다. 확률 값을 프로젝트 설정 파일에서 읽어오거나 특정 변수에 대입하여 사용할 텐데 이러한 경우 값을 변경할 때마다 다시 빌드 후에 배포하는 과정이 필요하다. 그러니까 테스트마다 확률 값 설정한 후 다시 빌드하고 배포해야 한다.
이럴 때 Spring Cloud Config가 도움을 줄 수 있다. 분산된 환경에서 설정 파일을 외부로 분리할 수 있도록 해준다. 개발/테스트 환경 그리고 운영 환경에서까지 모든 환경 구성을 간편하게 관리할 수 있다. 설정을 위한 별도의 서버를 구성하기 때문에 실행 중인 애플리케이션이 서버에서 설정 정보를 받아와 갱신하는 방식이다. 즉 실행 중에 설정값 변경이 필요해지면, 설정 서버만 변경하고 애플리케이션은 갱신하도록 해주기만 하면 된다. 따라서 설정이 바뀔 때마다 빌드와 배포가 필요 없는 구조이다.
2021년 1월 내용 추가: 스프링 부트 2.4 버전부터는 이 글의 예제에서 사용된
bootstrap.yml파일을 더 이상 사용하지 않습니다. 변경 사항에 대해서는 상단 목차의 네 번째 글 “Spring Boot 2.4 버전에서의 변경사항”을 참고하시기 바랍니다.
어떤 구조일까?
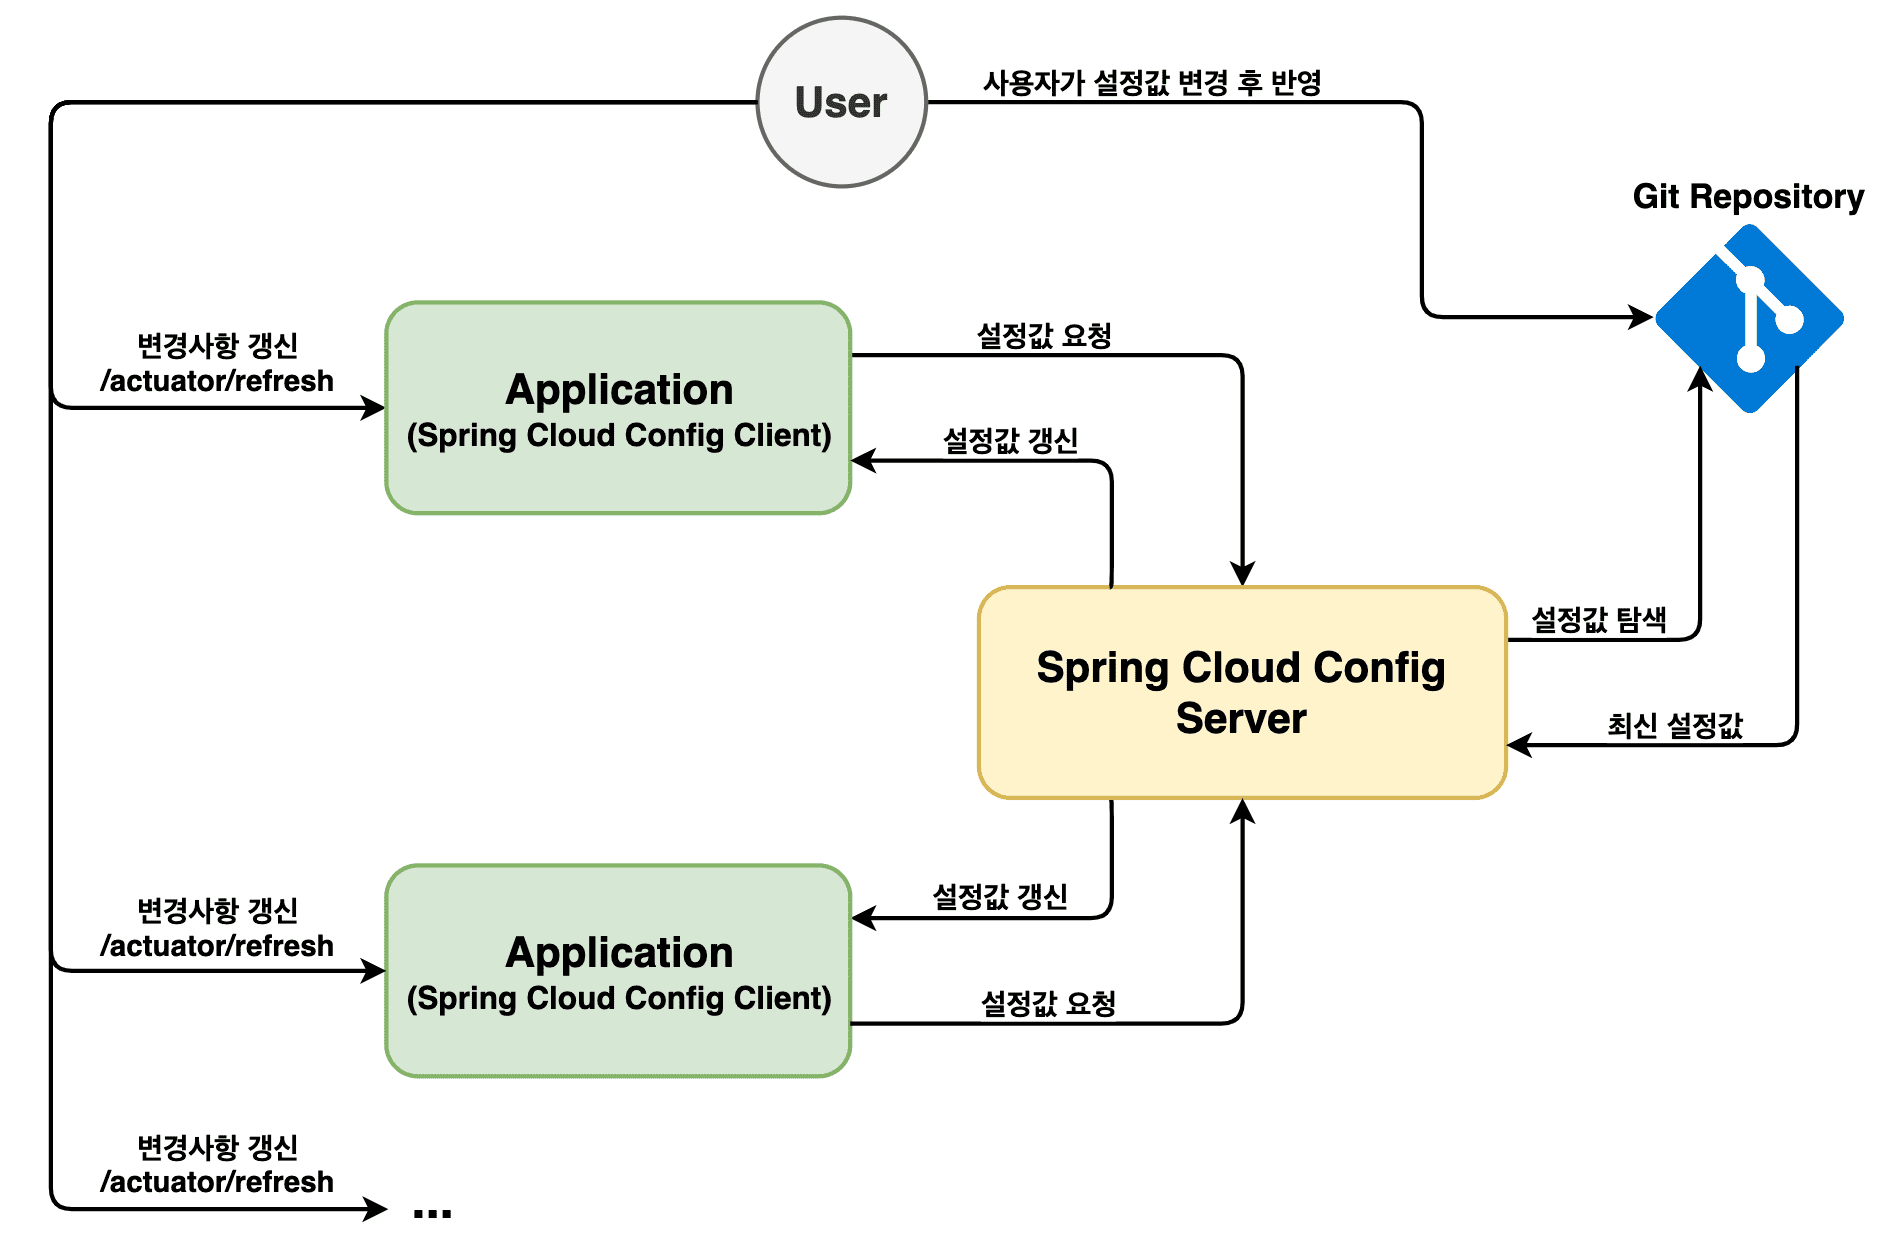
아래 이미지는 Spring Cloud Config의 기본 구조다. 동작 순서대로 과정을 살펴보자.
먼저 클라이언트는 서버로 설정값을 요청하면 서버는 설정 파일이 위치한 Git 저장소에 접근한다. 서버는 Git 저장소로부터 최신 설정값을 받고 클라이언트는 다시
서버를 통해 최신 설정값을 받는다. 만일, 사용자가 설정 파일을 변경하고 Git 저장소를 업데이트했다면 애플리케이션(클라이언트)의 actuator/refresh
엔드 포인트를 호출하여 설정값을 변경하도록 한다. 여기서의 설정값 갱신을 위한 엔드 포인트 호출은 각각의 클라이언트를 호출해야 하며 호출된 클라이언트만 반영된다.
이제 직접 코드를 작성하여 Spring Cloud Config를 사용해보자.
예제에서 사용한 코드는 모두 github에 있습니다. 글 하단 링크를 참고해주세요.
Spring Cloud Config Server
먼저 Config 서버를 구성해보자. 나중에 다시 언급하겠지만 클라이언트를 구동할 때는 지금 구성하고 있는 config 서버가 구동돼있어야 한다.
프로젝트 생성
스프링 부트 프로젝트를 생성한다. 물론 https://start.spring.io(링크) 를 통해서 생성해도 된다.
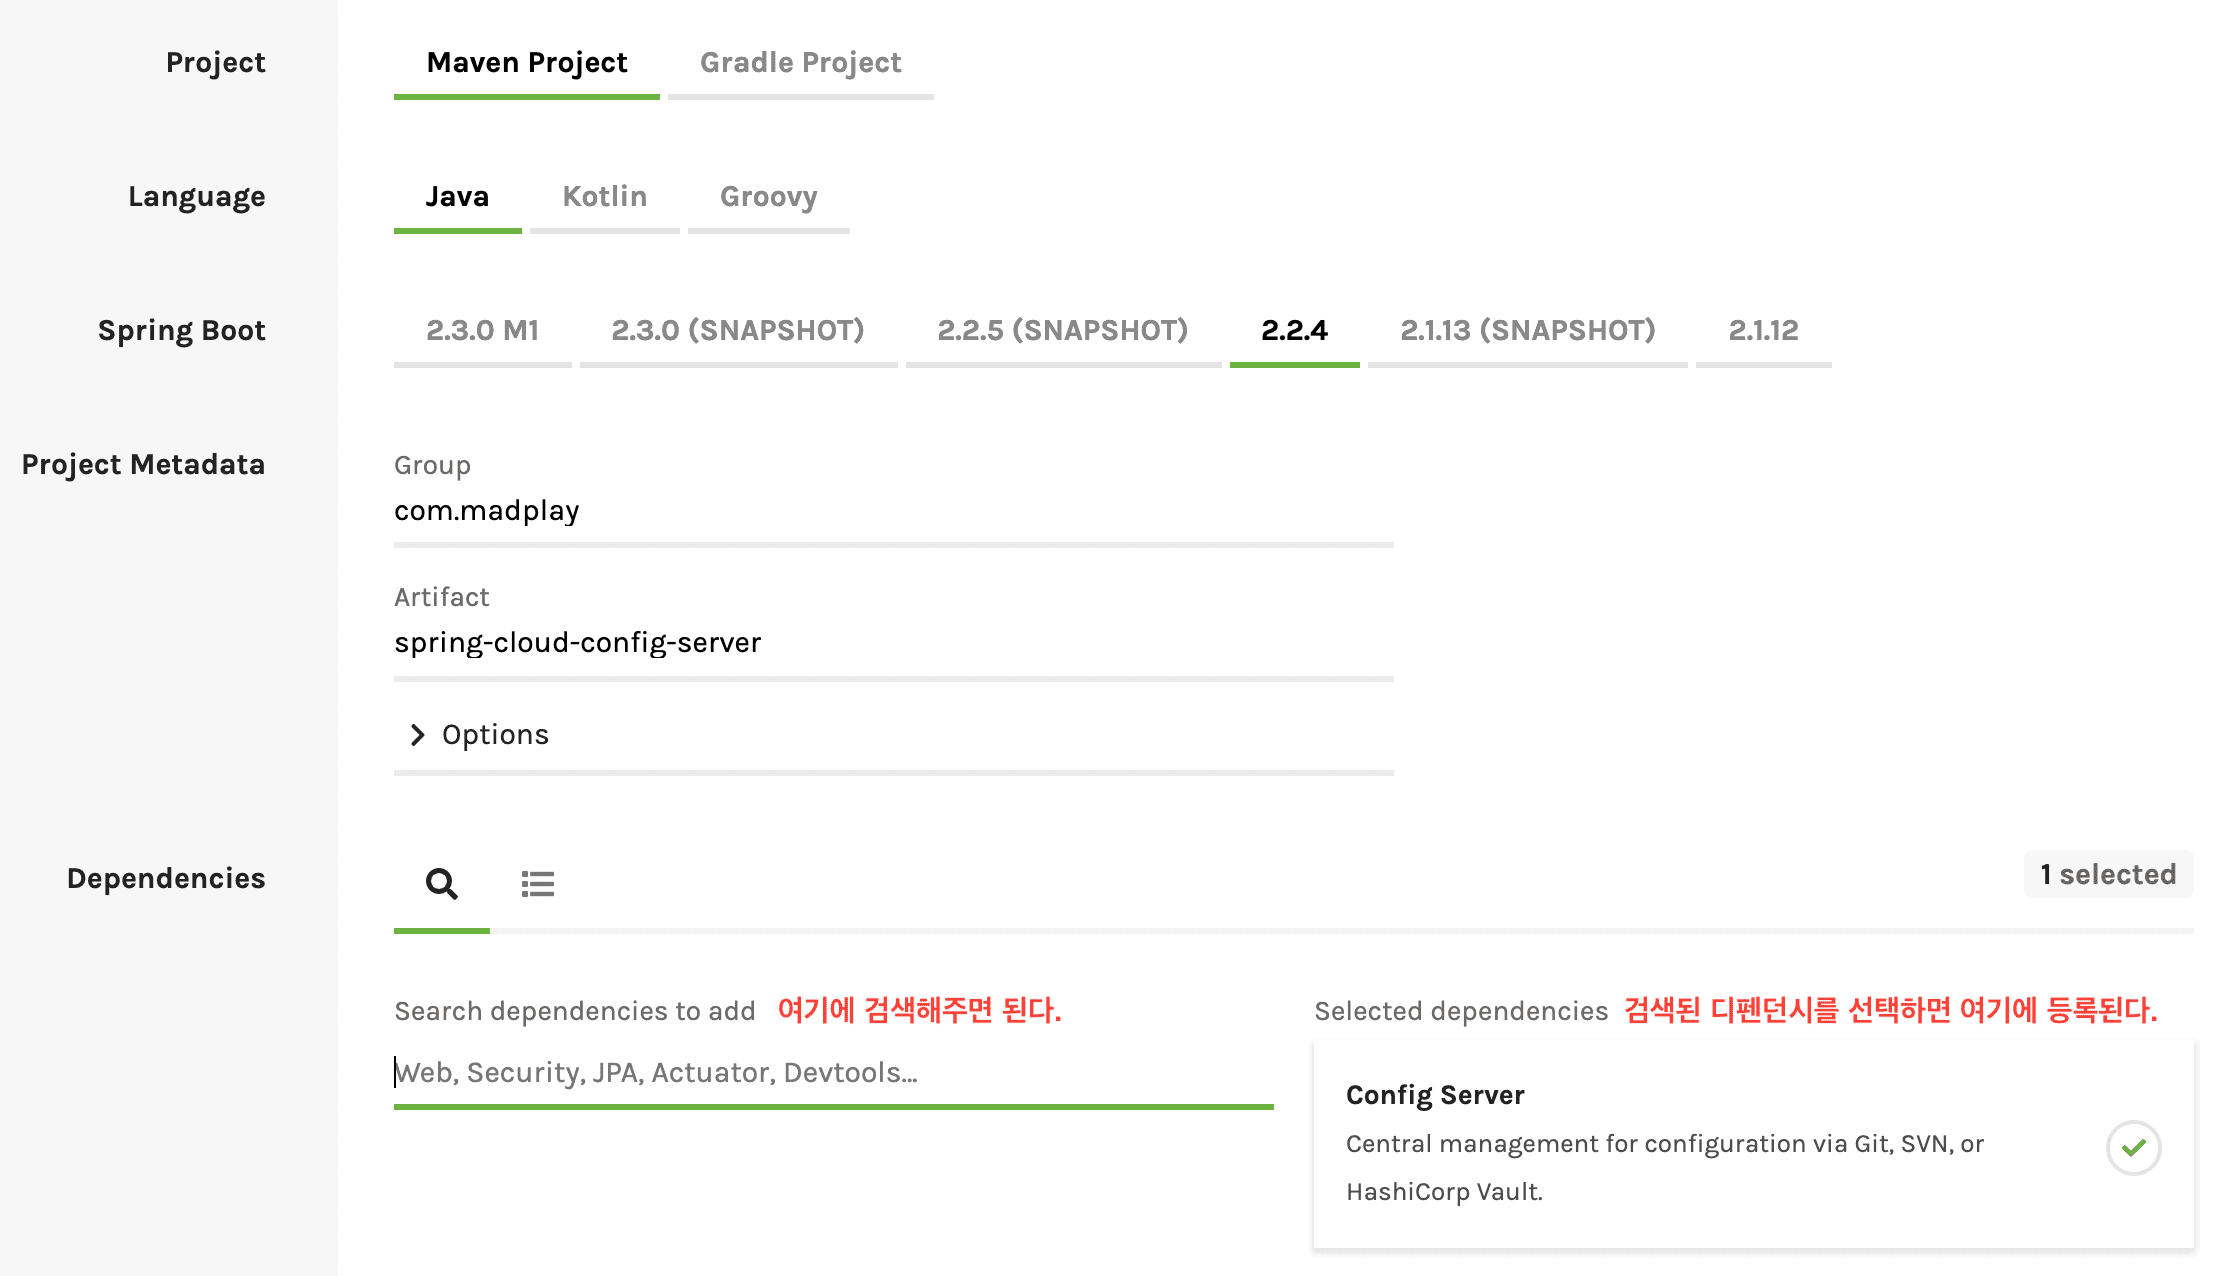
아니면 아래의 디펜던시를 pom.xml에 복사해도 된다.
<parent>
    <groupId>org.springframework.boot</groupId>
    <artifactId>spring-boot-starter-parent</artifactId>
    <version>2.2.4.RELEASE</version>
    <relativePath/>
</parent>

<properties>
    <java.version>1.8</java.version>
    <spring-cloud.version>Hoxton.SR1</spring-cloud.version>
</properties>

<dependencies>
    <dependency>
        <groupId>org.springframework.cloud</groupId>
        <artifactId>spring-cloud-config-server</artifactId>
    </dependency>
</dependencies>

<dependencyManagement>
    <dependencies>
        <dependency>
            <groupId>org.springframework.cloud</groupId>
            <artifactId>spring-cloud-dependencies</artifactId>
            <version>${spring-cloud.version}</version>
            <type>pom</type>
            <scope>import</scope>
        </dependency>
    </dependencies>
</dependencyManagement>
Config Server 설정
프로젝트의 Application 파일을 열어서 @EnableConfigServer 어노테이션을 선언해주면 된다.
@SpringBootApplication
@EnableConfigServer
public class ConfigServerApplication {

	public static void main(String[] args) {
		SpringApplication.run(ConfigServerApplication.class, args);
	}
}
다음으로 설정 파일을 수정하면 된다. application.yml 파일에 아래와 같이 선언해주자.
포트 번호는 config 서버가 8088 포트를 이용해 구동되는 것을 뜻한다. 그리고 설정 정보가 저장되는 저장소(repository)를 연동해주면 된다.
server:
  port: 8088
spring:
  cloud:
    config:
      server:
        git:
          uri: https://github.com/madplay/spring-cloud-config-repository
config 서버 설정은 끝이다. 다음으로 설정 파일들을 저장하는 config repository를 준비해보자.
Spring Cloud Config Repository
이번에는 설정 파일들만 만들어주면 되서 간단하다.
설정 파일 생성
새 프로젝트를 생성해서 루트 경로에 아래와 같이 설정 파일들을 만들면 된다.
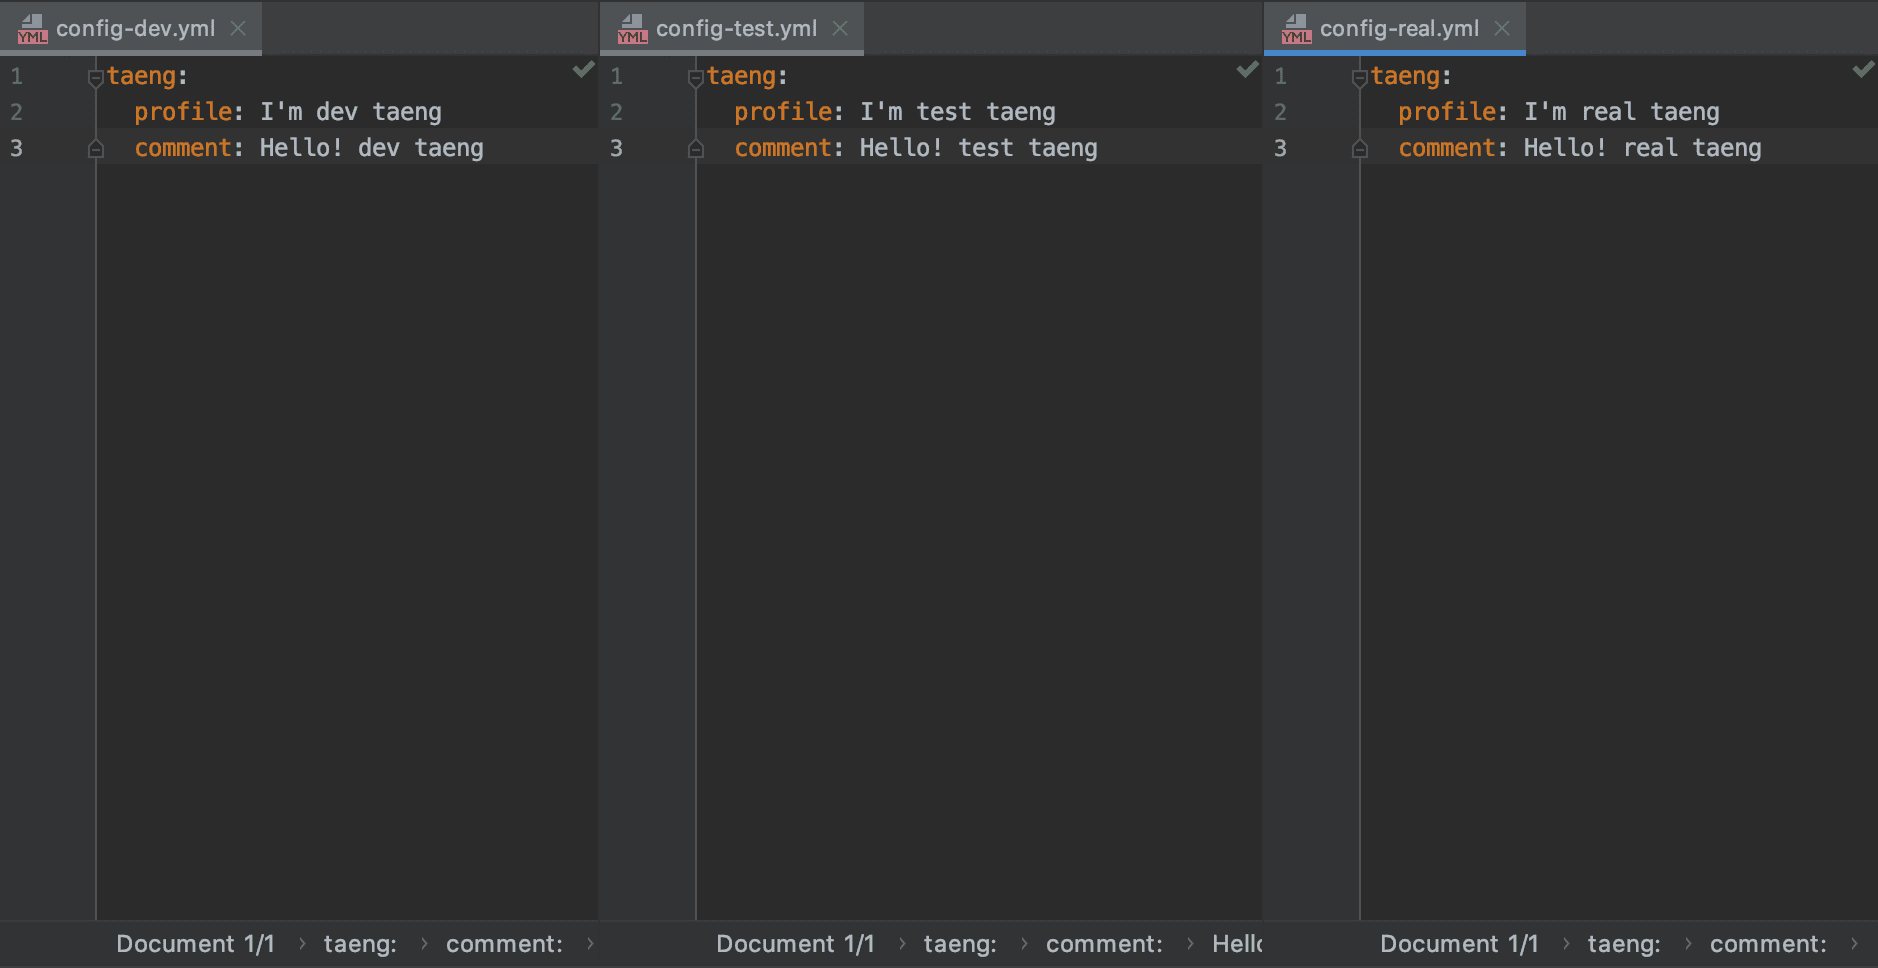
파일 이름은 보통 {애플리케이션 이름}-{환경별 이름}.yml 형태로 만든다. 그러니까 여기서는 애플리케이션 이름이 config가 되는 것이다.
지정한 {application} 값은 클라이언트 설정에도 사용해야 하므로 기억해두자.
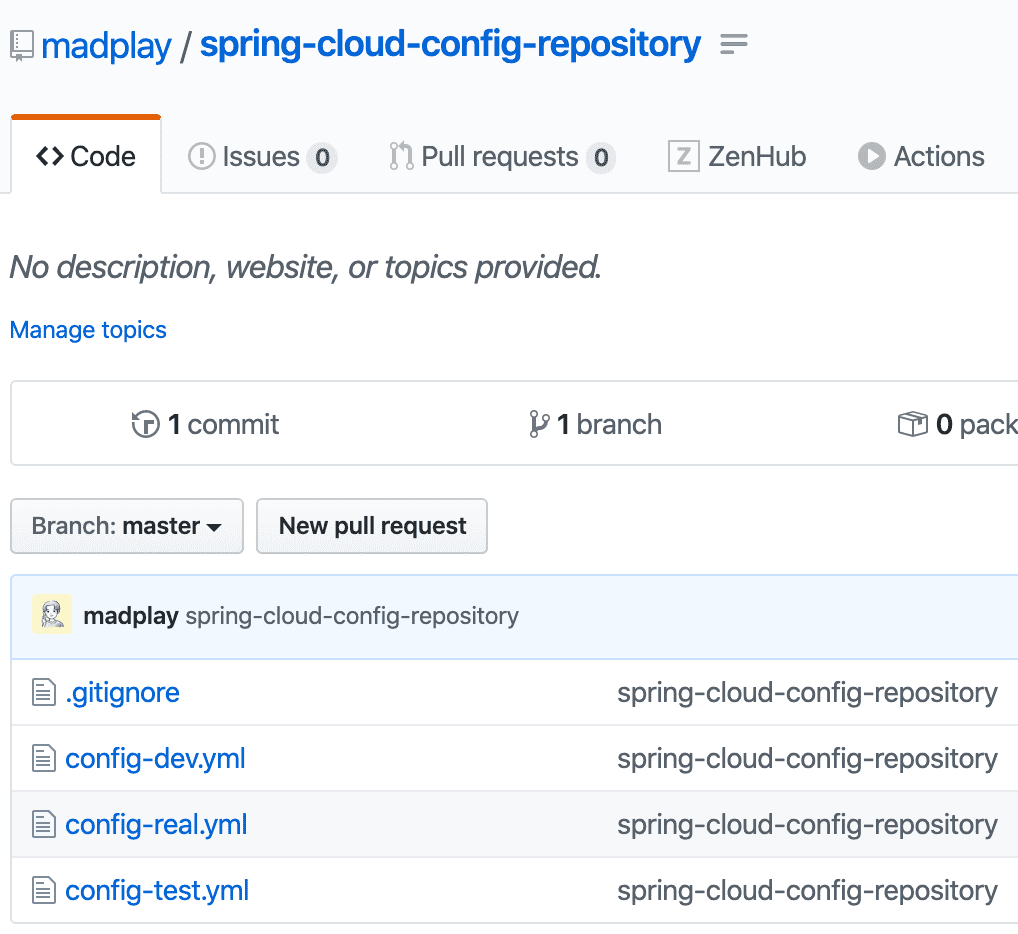
이제 설정 파일 준비는 끝났다. 앞서 언급한 것처럼 설정 파일들은 Git Repository에 저장된다. 자신의 깃허브 계정으로 로그인하여 저장소를 하나 생성해보자. 중요한 것은 git 저장소의 주소는 config 서버의 **application.yml에 선언된 주소와 동일해야 한다.
설정 파일 테스트
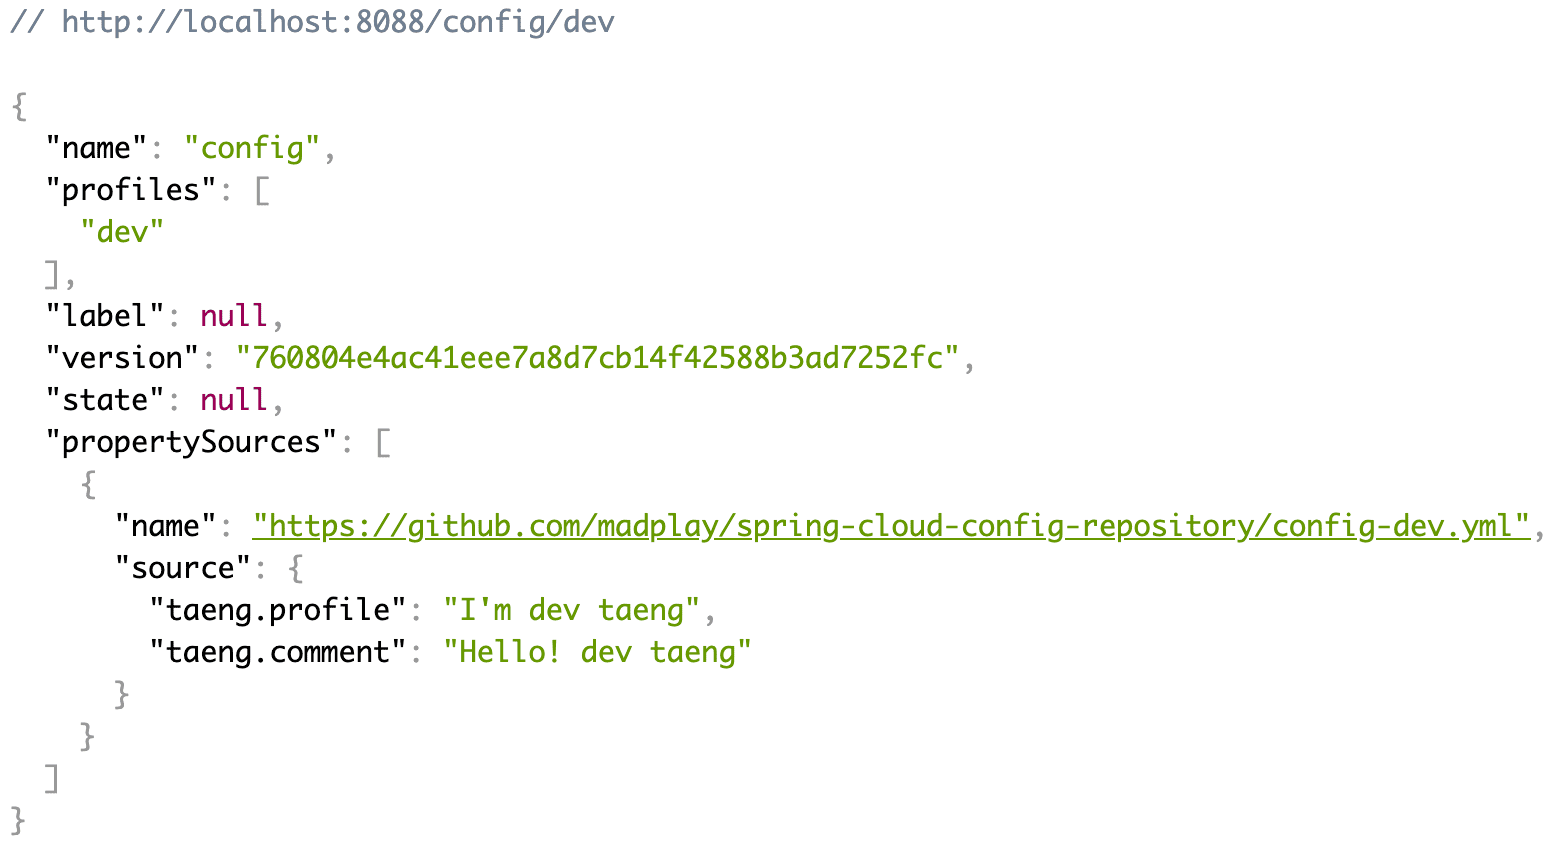
설정 정보 관련한 작업은 끝났다. Client를 구성하기 전에 Server가 정상적으로 구동되는지 한 번 실행해보자. Server의 포트를 8088로 설정했기 때문에 아래와 같이 확인할 수 있다. 물론 GET이기 때문에 간단하게 브라우저로 접속하여 바로 확인할 수도 있다.
# dev, test, real 모두 확인 가능하다.
$ curl -X GET "http://localhost:8088/config/dev"
참고로 Spring Cloud Config Server는 아래와 같은 엔드 포인트를 가진다.
GET /{application}/{profile}[/{label}]
GET /{application}-{profile}.yml
GET /{label}/{application}-{profile}.yml
GET /{application}-{profile}.properties
GET /{label}/{application}-{profile}.properties
{application} 값은 애플리케이션 이름을 나타내고, {profile}은 active.profile과 매칭된다.
label 값의 경우에는 선택적인 값인데, git 저장소의 브랜치 정보다. 예상한 것처럼 기본값은 master 이다.
각 환경별로 파일이 늘어나는 것을 선호하지 않는다면 한 파일에 모두 작성해도 된다.
spring.profiles: dev
taeng:
  profile: I'm dev taeng
  comment: Hello! dev taeng

---
spring.profiles: test
taeng:
  profile: I'm dev taeng
  comment: Hello! test taeng

---
spring.profiles: real
taeng:
  profile: I'm real taeng
  comment: Hello! real taeng
파일 내용이 길어지는 단점이 있겠지만 Git 저장소에서 관리되는 파일의 개수가 적어지는 큰 장점이 있다.
Spring Cloud Config Client
이제 config 클라이언트를 구성해보자.
프로젝트 생성
역시나 https://start.spring.io 에서 생성해도 된다. 아래와 같이 입력해주면 된다.
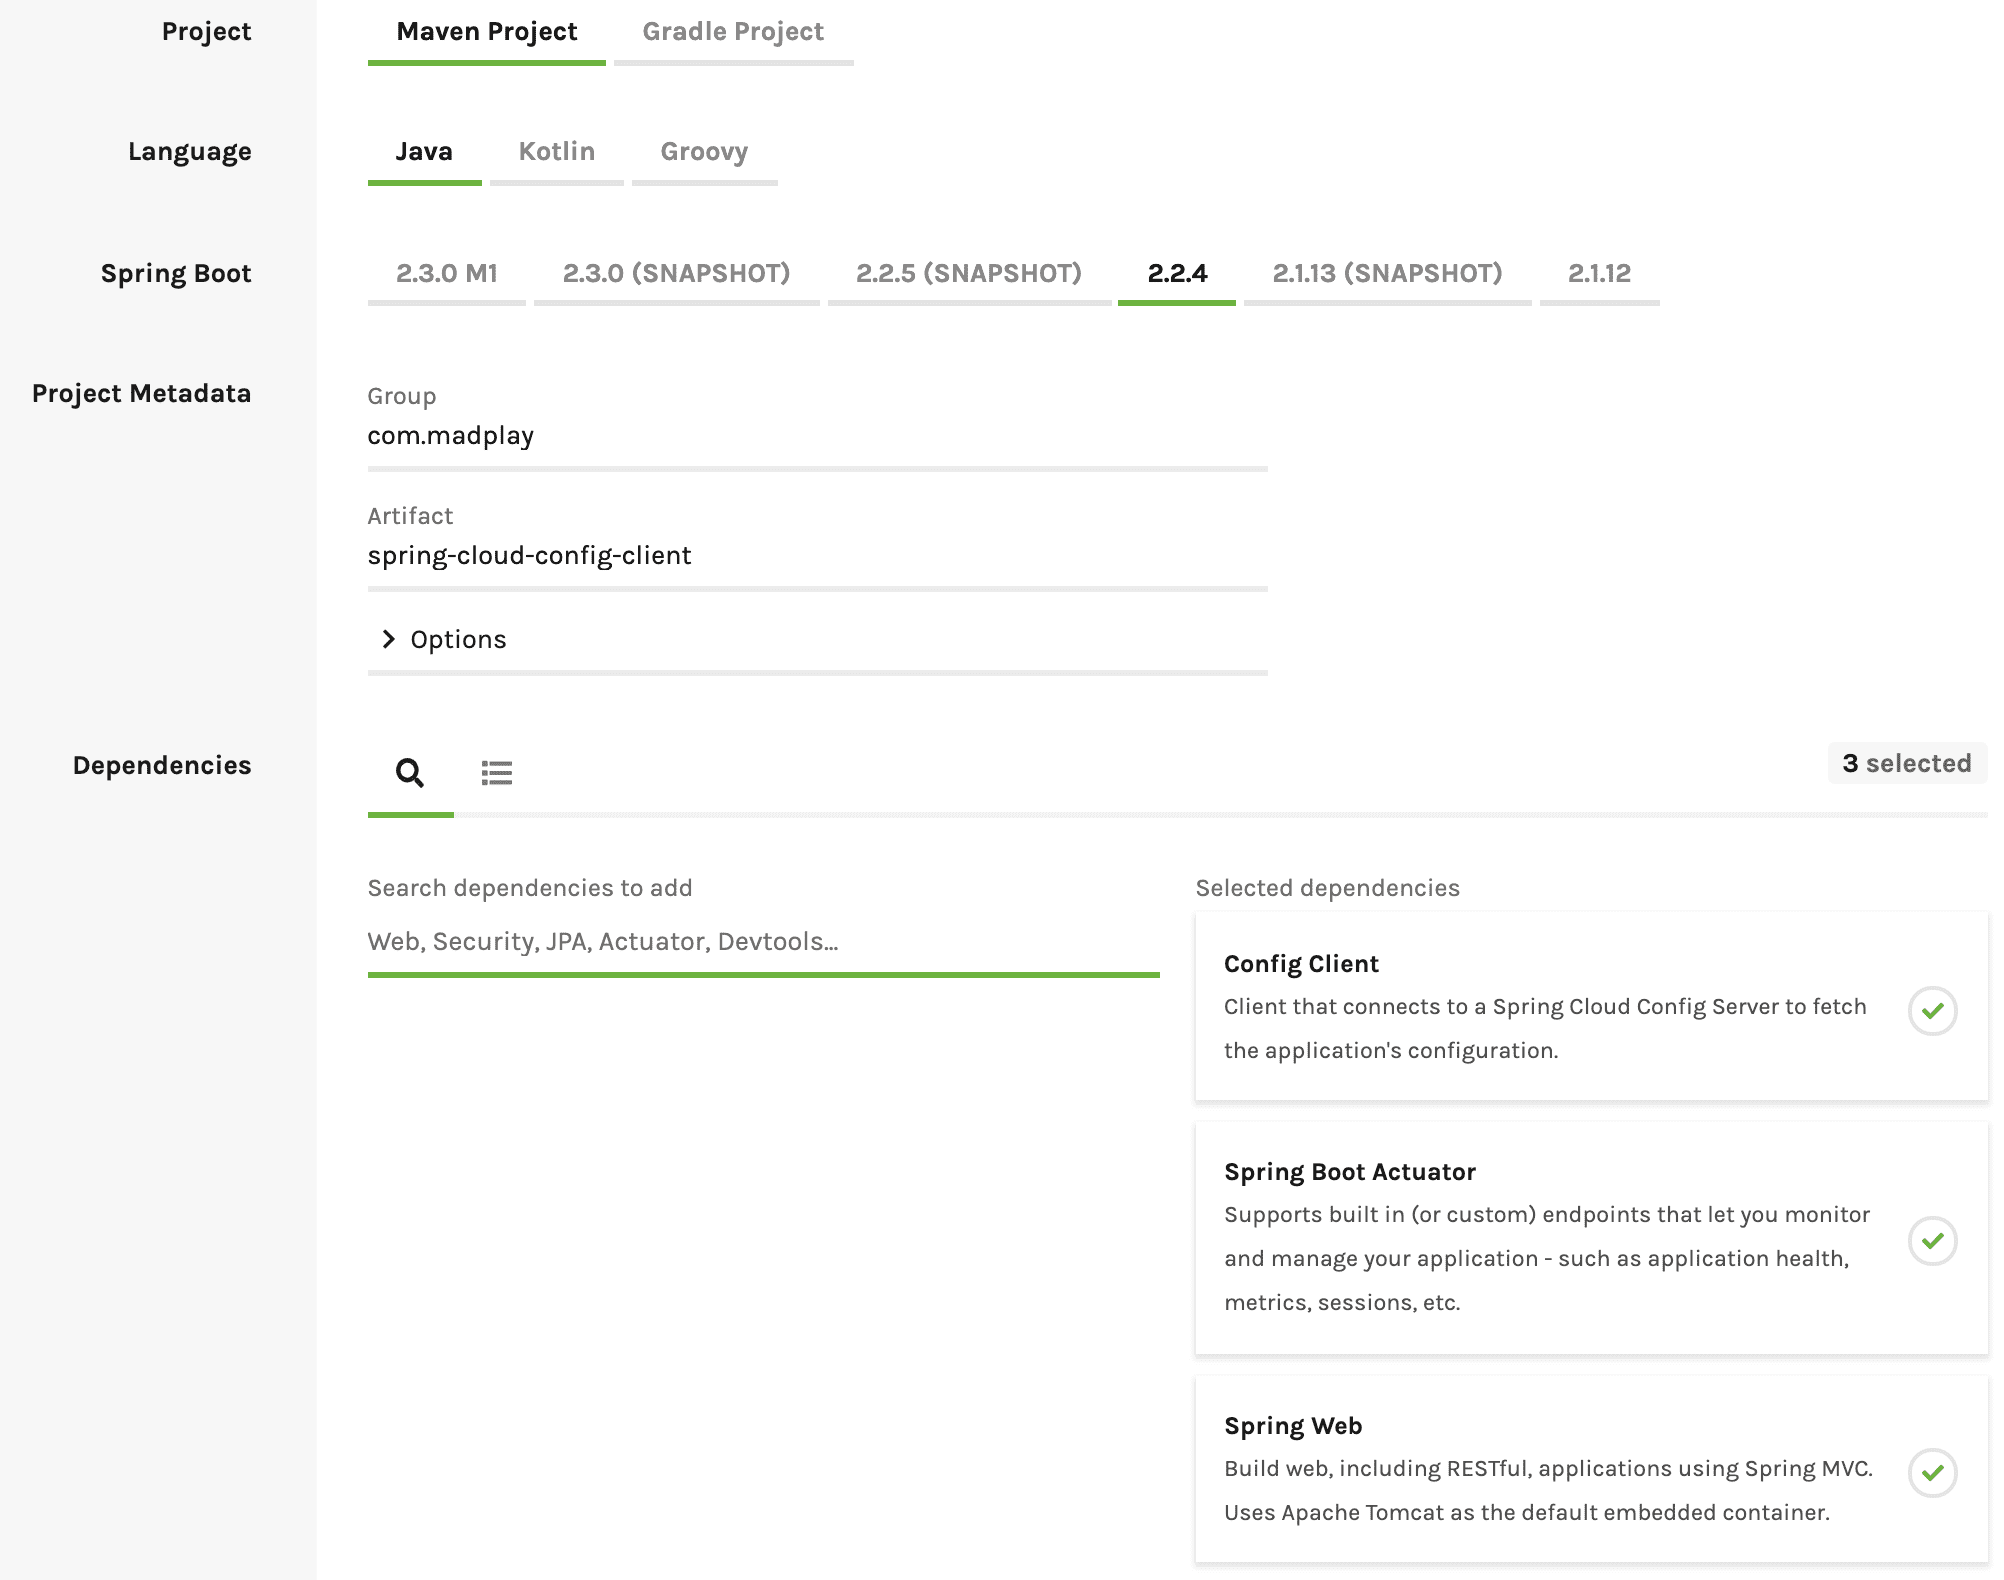
아니면 아래 코드를 pom.xml에 넣어도 된다.
<parent>
    <groupId>org.springframework.boot</groupId>
    <artifactId>spring-boot-starter-parent</artifactId>
    <version>2.2.4.RELEASE</version>
    <relativePath/>
</parent>

<properties>
    <java.version>1.8</java.version>
    <spring-cloud.version>Hoxton.SR1</spring-cloud.version>
</properties>

<dependencies>
    <dependency>
        <groupId>org.springframework.boot</groupId>
        <artifactId>spring-boot-starter-actuator</artifactId>
    </dependency>
    <dependency>
        <groupId>org.springframework.boot</groupId>
        <artifactId>spring-boot-starter-web</artifactId>
    </dependency>
    <dependency>
        <groupId>org.springframework.cloud</groupId>
        <artifactId>spring-cloud-starter-config</artifactId>
    </dependency>
</dependencies>

<dependencyManagement>
    <dependencies>
        <dependency>
            <groupId>org.springframework.cloud</groupId>
            <artifactId>spring-cloud-dependencies</artifactId>
            <version>${spring-cloud.version}</version>
            <type>pom</type>
            <scope>import</scope>
        </dependency>
    </dependencies>
</dependencyManagement>
Config Client 설정
그리고 bootstrap.yml에 아래와 같이 작성한다. bootstrap.yml은 스프링 부트 애플리케이션이 가동될 때 application.yml 보다
더 먼저 로드 된다. 그래서 실행되기 전에 앞서 설정한 config 서버에서 설정 파일을 불러와서 실행하게 된다.
server:
  port: 8089
spring:
  profiles: # 여기에 지정해도 되고, 실행할 때 지정해도 된다.
    active: dev
  application:
    name: config
  cloud:
    config:
      uri: http://localhost:8088
management:
  endpoints:
    web:
      exposure:
        include: refresh
서비스 레이어 작성
이제 테스트를 도와줄 2개의 서비스 레이어 클래스를 만들 것이다. 두 개 모두 config 서버의 설정 정보를 참조한다. 하지만 하나는 설정값이 변경되더라도 다시 빌드, 배포하지 않아도 변경된 값을 보여준다.
/**
 * @author madplay
 */
@Service
public class StaticConfigService {

	@Value("${taeng.profile}")
	private String profile;
	@Value("${taeng.comment}")
	private String comment;

	public Map<String, String> getConfig() {
		Map<String, String> map = new HashMap<>();
		map.put("profile", profile);
		map.put("comment", comment);
		return map;
	}
}
이름부터 다르긴 하지만 여기서 주의 깊게 봐야 하는 것은 @RefreshScope이다.
config 저장소에서 설정 파일을 변경했을 때 변경사항을 갱신할 수 있도록 설정하는 것이다.
/**
 * @author madplay
 */
@Service
@RefreshScope // 여기가 다르다.
public class DynamicConfigService {

	@Value("${taeng.profile}")
	private String profile;
	@Value("${taeng.comment}")
	private String comment;

	public Map<String, String> getConfig() {
		Map<String, String> map = new HashMap<>();
		map.put("profile", profile);
		map.put("comment", comment);
		return map;
	}
}
컨트롤러 작성
이제 이들을 테스트할 수 있는 컨트롤러(Controller)를 만들어보자.
/**
 * @author madplay
 */
@RestController
public class ConfigController {

	private final StaticConfigService configStaticService;
	private final DynamicConfigService configDynamicService;

	@Autowired // 단일 생성자여서 어노테이션을 제외해도 되긴하다.
	public ConfigController(StaticConfigService configStaticService, DynamicConfigService configDynamicService) {
		this.configStaticService = configStaticService;
		this.configDynamicService = configDynamicService;
	}

	@GetMapping(value = "/static")
	public Object getConfigFromStatic() {
		return configStaticService.getConfig();
	}

	@GetMapping(value = "/dynamic")
	public Object getConfigFromDynamic() {
		return configDynamicService.getConfig();
	}
}
Config Client 실행 해보기
이제 config client를 실행해보자. bootstrap.yml에 실행할 profile 옵션을 넣었기 때문에 아무런 설정없이 실행해도 된다.
실행하면서 직접 환경을 지정하고 싶은 경우는 -Dspring.profiles.active=dev 처럼 옵션을 넣어주면 된다.
만일 인텔리제이를 사용한다면 Run/Debug Configuration에서 Active Profiles에 dev만 입력해주면 된다.
client가 구동될 때 시작 로그가 중요하다. 실제로 설정 정보를 어디서 가져오는지 확인해볼 수 있다. 아래와 같이 출력되는지 확인해보자. 참고로 config server도 실행된 상태여야 한다.
Fetching config from server at : http://localhost:8088
Located environment: name=config, profiles=[dev], label=null, version=760804e4ac41eee7a8d7cb14f42588b3ad7252fc, state=null
Located property source: [BootstrapPropertySource {name='bootstrapProperties-configClient'},
    BootstrapPropertySource {name='bootstrapProperties-https://github.com/madplay/spring-cloud-config-repository/config-dev.yml'}]
테스트 해보기
이제 정상적으로 동작하는지 확인해보자. config 서버와 클라이언트가 모두 실행되고 있는 상태여야 한다.
클라이언트 응답 확인
아래 URL로 접속해서 테스트해보자. 아마 같은 결과가 나올 것이다.
$ curl -X GET "http://localhost:8089/static"$ curl -X GET "http://localhost:8089/dynamic"
# 출력 결과
{
    "profile": "I'm dev taeng",
    "comment":"Hello! dev taeng"
}
client가 실행될 때 dev 옵션을 주었기 때문에, dev 환경의 설정을 읽어와 출력해준다.
동적으로 설정 변경
그럼 이제 동적으로 변경해보자. Git Repository의 파일을 변경해야 한다. config-dev.yml 파일의 값을 변경해보자.
taeng:
  profile: I'm dev taeng
  comment: Hello! updated dev taeng!!!
바로 변경되면 좋겠으나 아래와 같이 갱신 작업이 필요하다. /actuator/refresh path로 POST 요청을 하면 된다.
잘못된 push 등을 위한 대비책이 아닐까 싶다. 그런데 바로 업데이트 되도록 하는 Spring Cloud Bus가 있다.
$ curl -X POST "http://localhost:8089/actuator/refresh"
그 다음에 다시 /static과 /dynamic의 결과를 확인해보자. 예상한 것처럼 dynamimc의 결과만 갱신되었다.
# 출력 결과
{
  "profile": "I'm dev taeng",
  "comment": "Hello! updated dev taeng!!!"
}
마치며
간단한 예제였지만 이처럼 Spring Cloud Config 를 사용하면 설정 파일을 외부로 분리할 수 있고 실행중에 빌드, 배포 없이 동적으로 변경시킬 수 있다.
그런데 설정값이 변경될 때마다 모든 애플리케이션이 갱신하도록 수동 요청하는 것이 번거롭다고 느껴지지 않는가? 많은 수의 클라이언트가 존재한다면 이것또한 번거로운 작업이 될 수 있다. Spring에서는 이러한 문제를 극복하기 위해 Spring Cloud Bus 라는 해결책을 가지고 있다. 이어지는 포스팅에서 어떤 방식인지 살펴보자.
예제 소스 코드
이번 글의 예제에서 사용한 소스 코드는 모두 아래 코드 저장소에 있습니다.
- config server & config client
- config repository