Table of Contents
- Spring Cloud Config: Introduction and Example
- Spring Cloud Config: Spring Cloud Bus Example
- Spring Cloud Config: Auto Refresh with Git Webhook
- Spring Cloud Config: Changes in Spring Boot 2.4
Why Spring Cloud Config?
Assume you run an A/B test that changes ad exposure probability. You may start at 5% and later change to 10%. If the value is in application config, each change normally requires rebuild and redeploy.
Spring Cloud Config solves this by externalizing configuration in distributed environments. You can manage dev/test/prod settings centrally through a dedicated config server. Running applications fetch config from that server and refresh when needed. So when config changes, you update the config server side instead of rebuilding every client.
Added in January 2021: Starting with Spring Boot 2.4,
bootstrap.ymlused in this article is no longer the recommended approach. See the fourth article in the table of contents: “Changes in Spring Boot 2.4”.
Architecture Overview
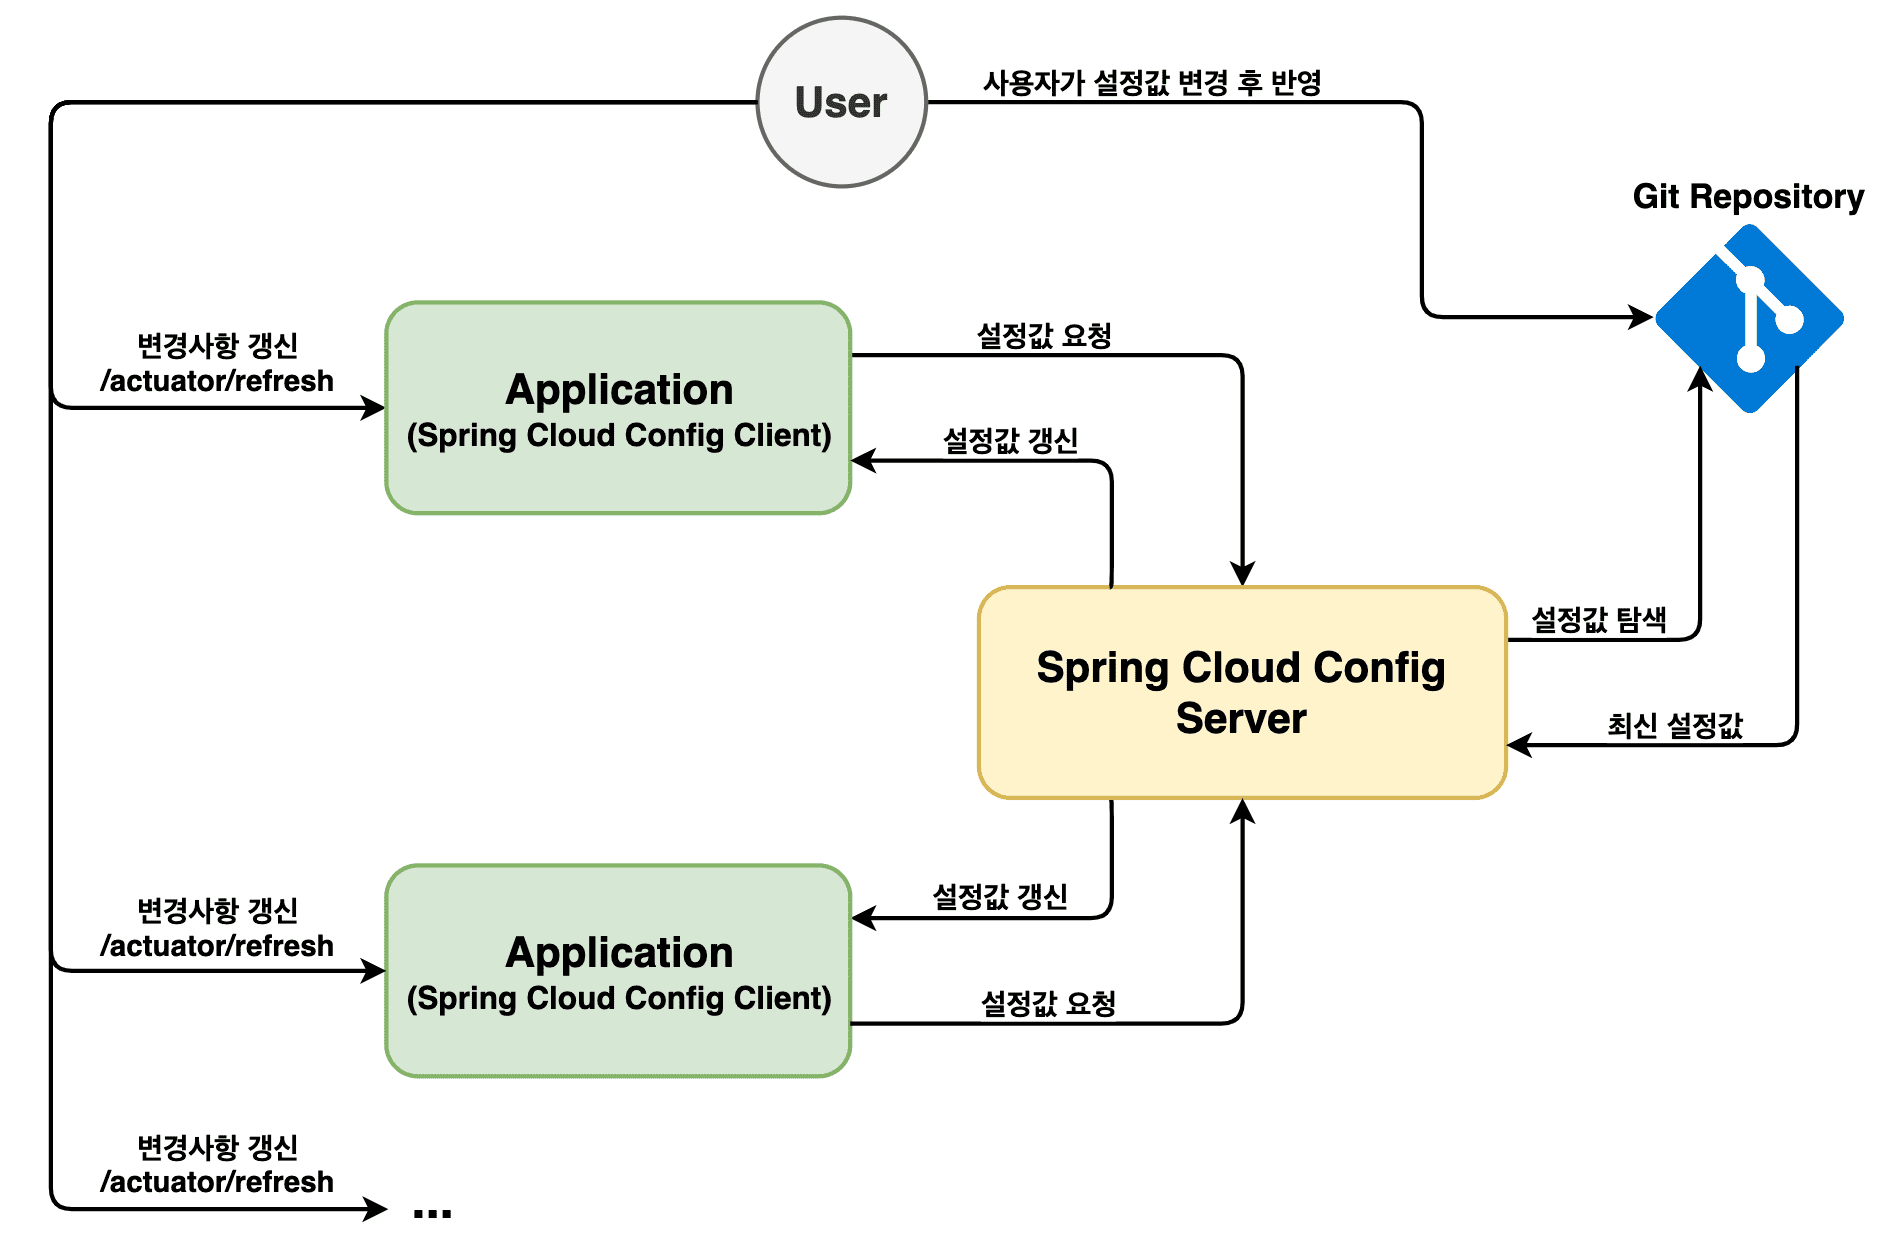
The image below shows the basic Spring Cloud Config flow.
A client requests config from Config Server. The server reads the latest settings from a Git repository. The client then receives those settings from the server.
If config files are updated and pushed to Git,
you can call the client’s actuator/refresh endpoint to apply updates.
In this basic setup, you must call each client separately,
and only called clients refresh.
Now let’s implement it.
All sample code is available on GitHub (links at the bottom).
Spring Cloud Config Server
Build Config Server first. Later, clients must start while this server is already running.
Create Project
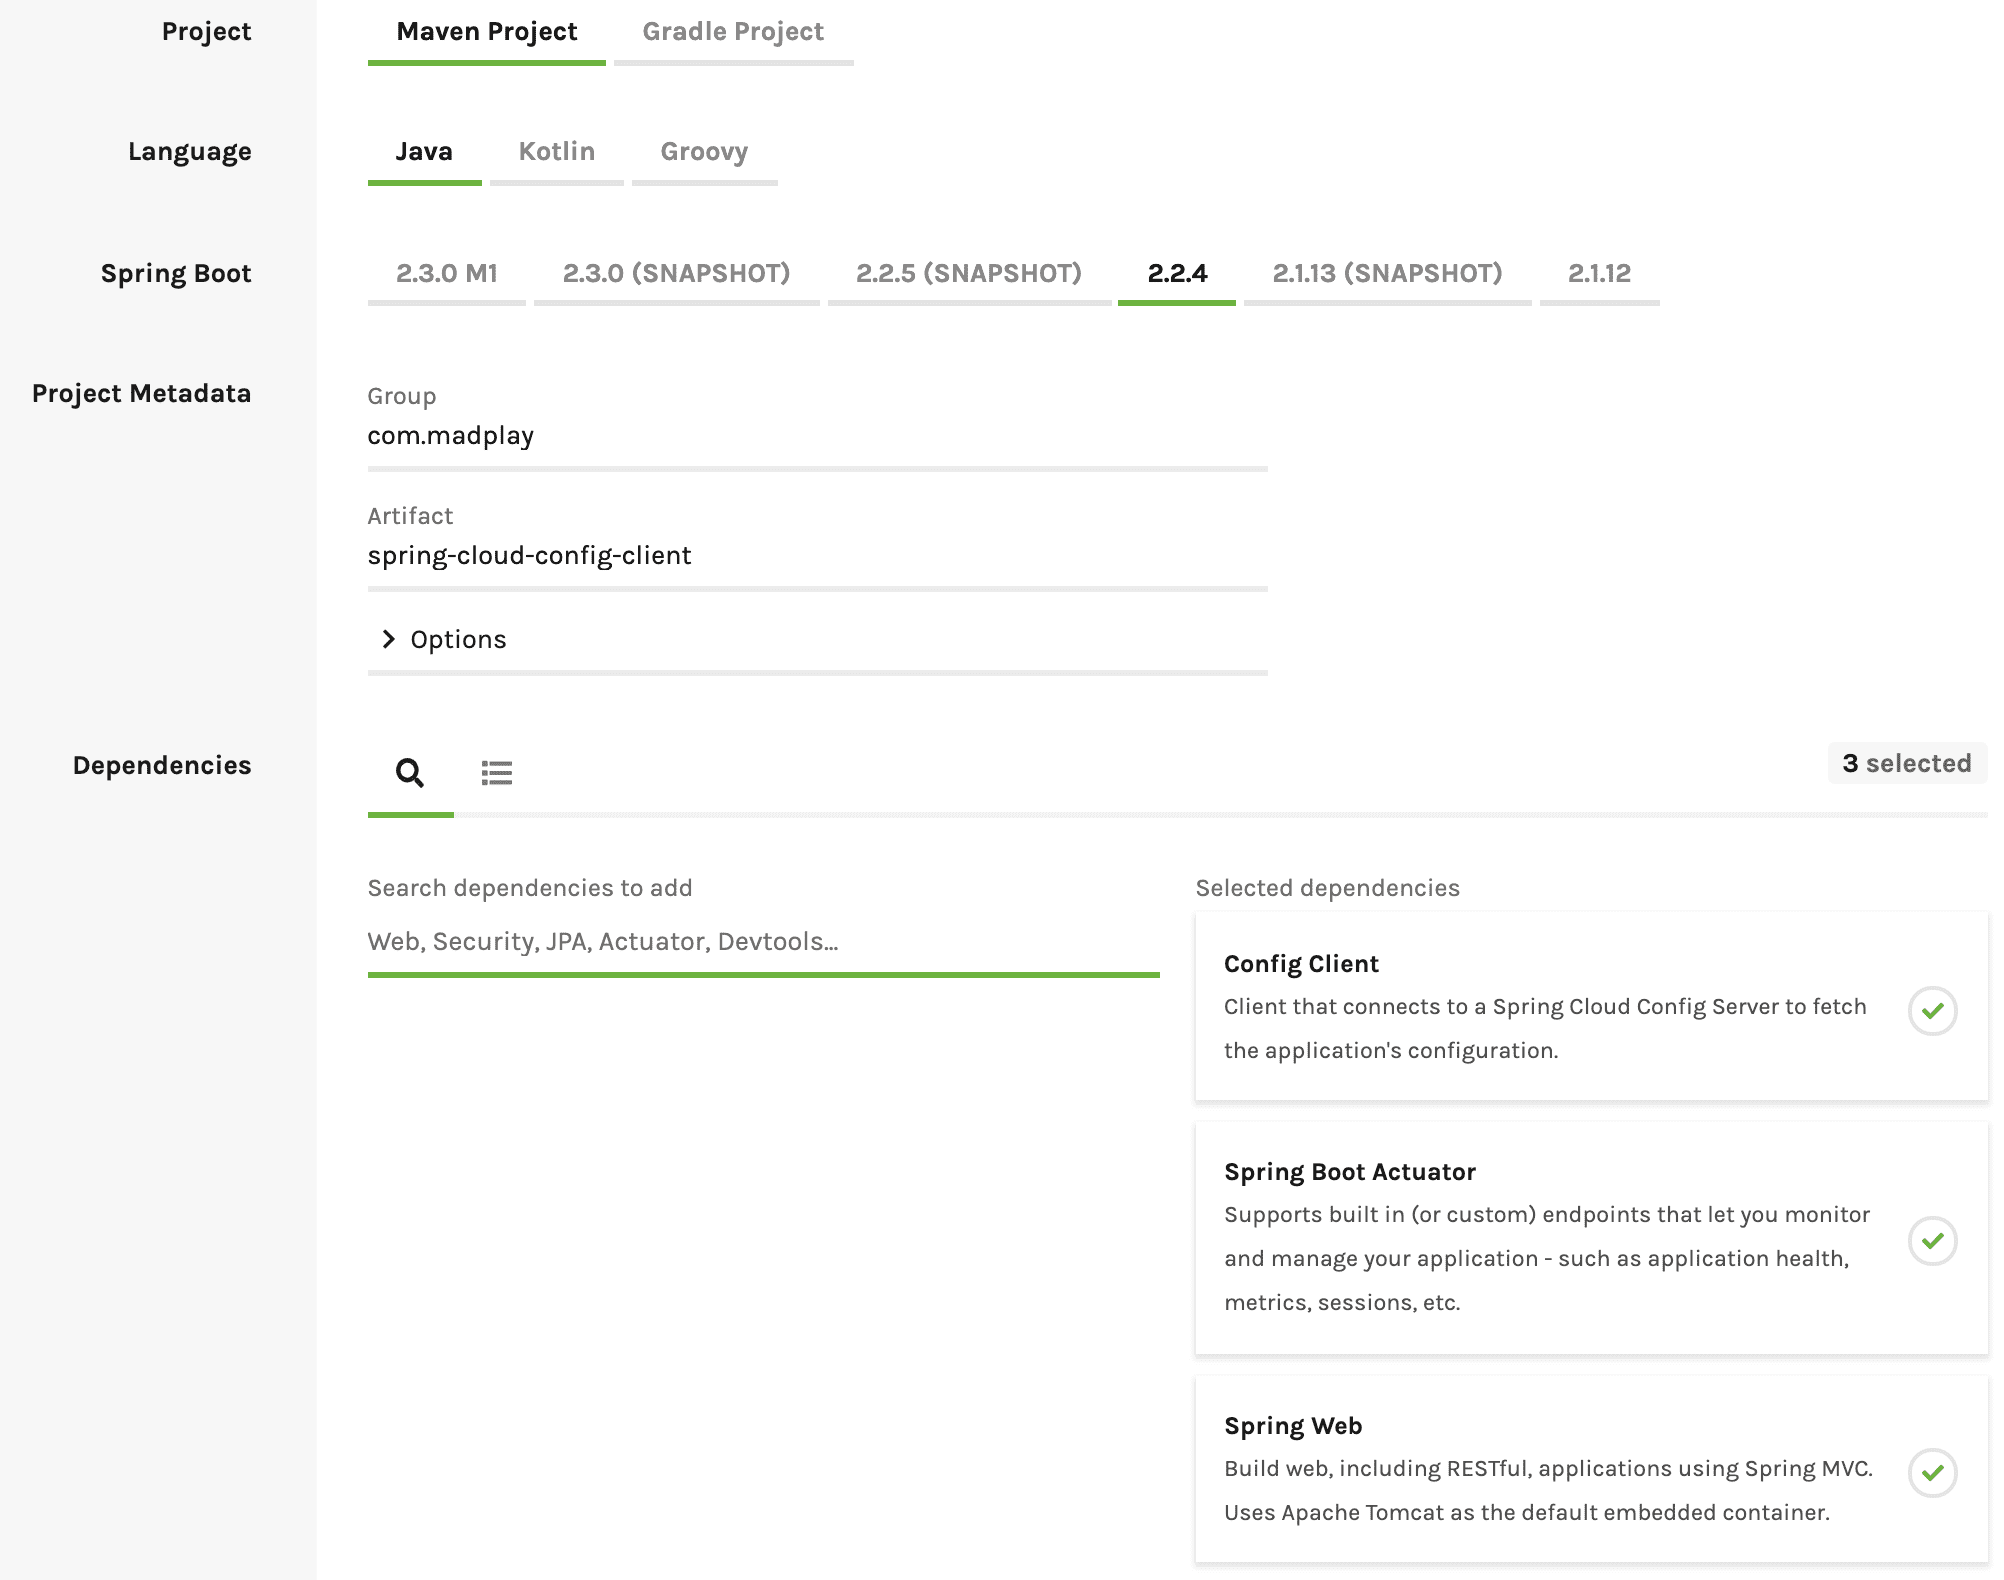
Create a Spring Boot project, or use https://start.spring.io.
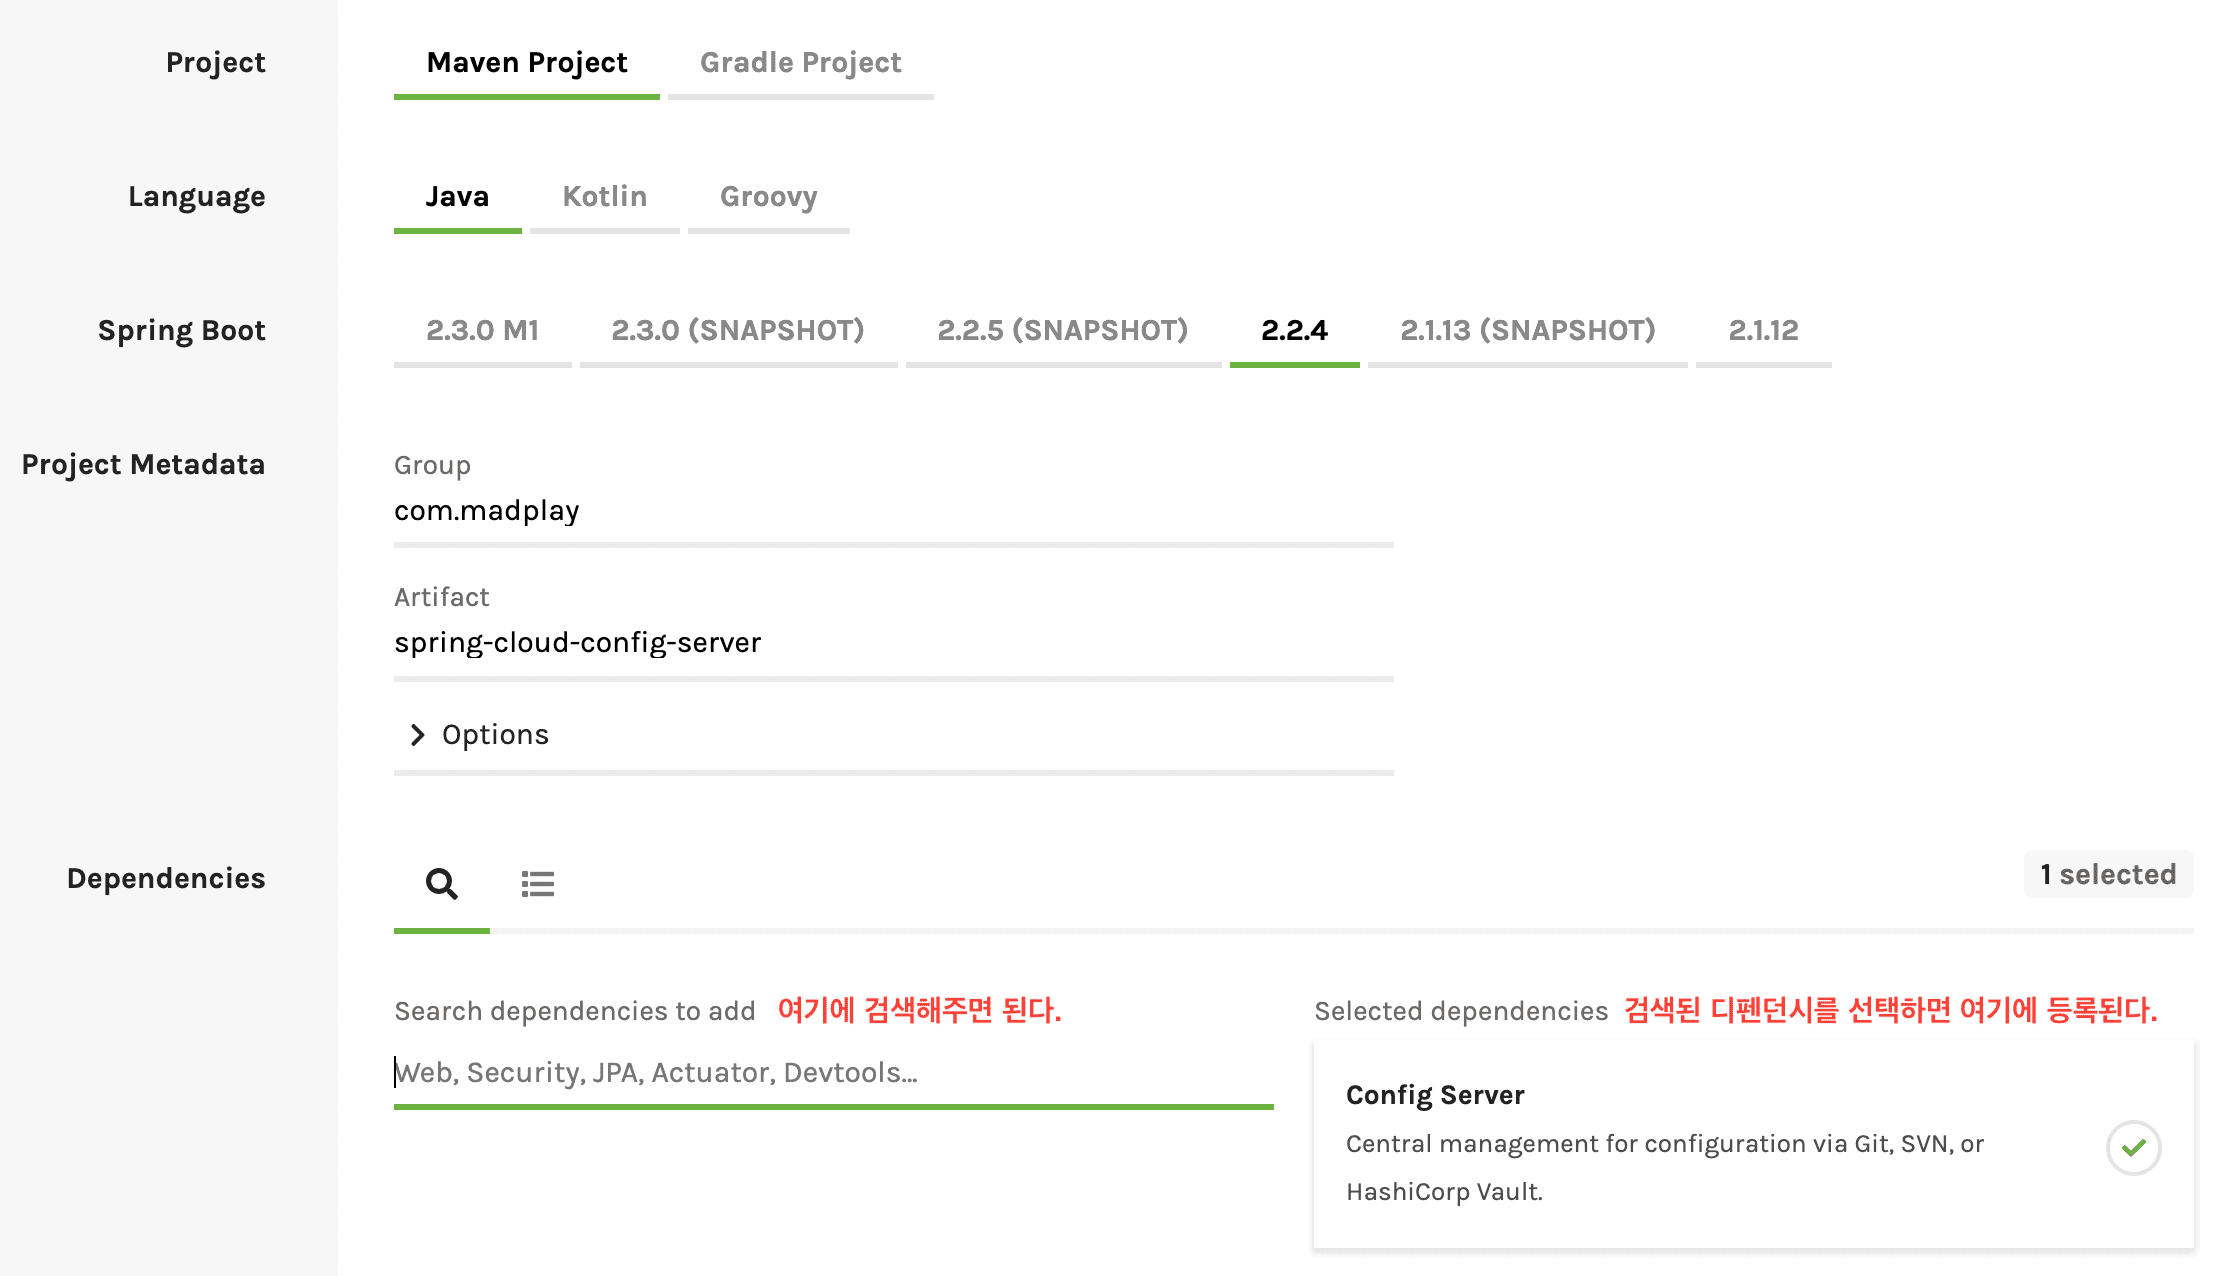
Or copy dependencies into pom.xml:
<parent>
    <groupId>org.springframework.boot</groupId>
    <artifactId>spring-boot-starter-parent</artifactId>
    <version>2.2.4.RELEASE</version>
    <relativePath/>
</parent>

<properties>
    <java.version>1.8</java.version>
    <spring-cloud.version>Hoxton.SR1</spring-cloud.version>
</properties>

<dependencies>
    <dependency>
        <groupId>org.springframework.cloud</groupId>
        <artifactId>spring-cloud-config-server</artifactId>
    </dependency>
</dependencies>

<dependencyManagement>
    <dependencies>
        <dependency>
            <groupId>org.springframework.cloud</groupId>
            <artifactId>spring-cloud-dependencies</artifactId>
            <version>${spring-cloud.version}</version>
            <type>pom</type>
            <scope>import</scope>
        </dependency>
    </dependencies>
</dependencyManagement>
Configure Config Server
Add @EnableConfigServer in your application class:
@SpringBootApplication
@EnableConfigServer
public class ConfigServerApplication {

	public static void main(String[] args) {
		SpringApplication.run(ConfigServerApplication.class, args);
	}
}
Then update application.yml.
Port 8088 is for Config Server, and uri points to the config repository.
server:
  port: 8088
spring:
  cloud:
    config:
      server:
        git:
          uri: https://github.com/madplay/spring-cloud-config-repository
Config Server setup is done. Next, prepare the config repository.
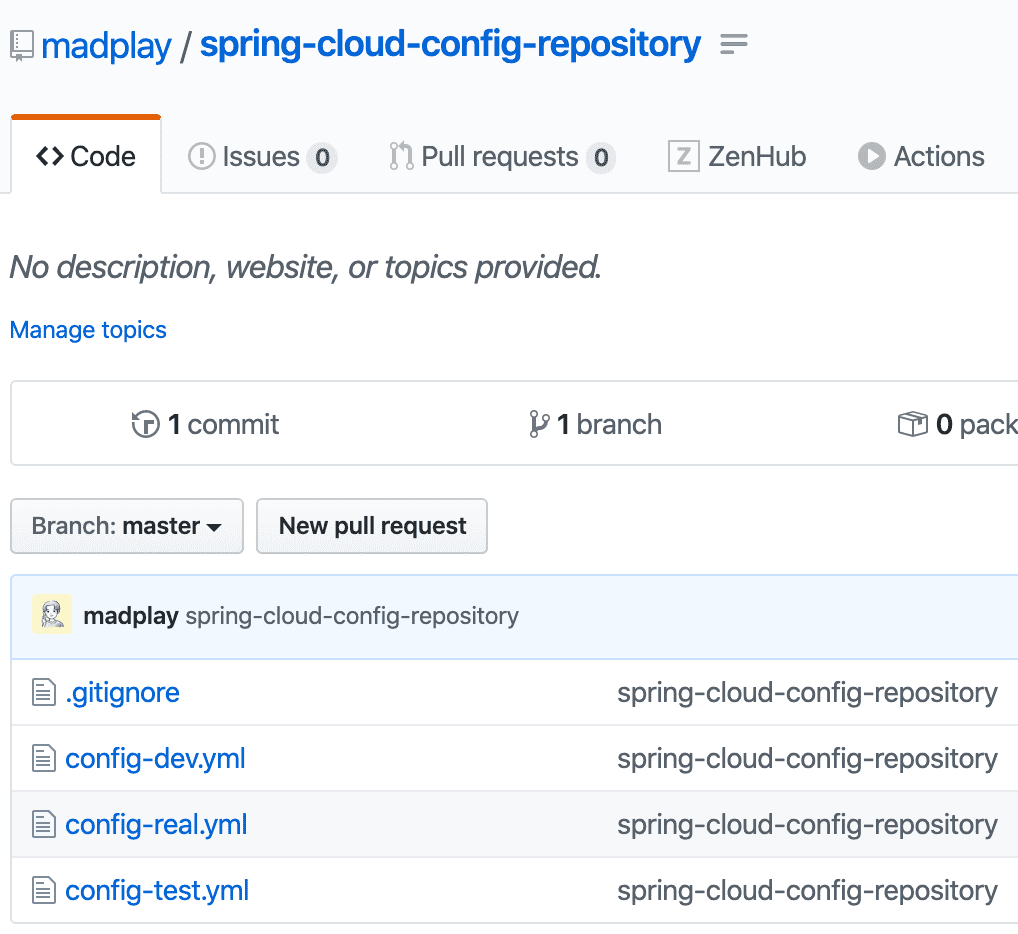
Spring Cloud Config Repository
This step is simple: create config files.
Create Config Files
Create a project and add files at root like below.
Typical naming: {application}-{profile}.yml.
In this example, {application} is config.
Remember this value because clients also use it.
Store these files in a Git Repository.
The repository URL must match the URL in server application.yml.
Test Config Files
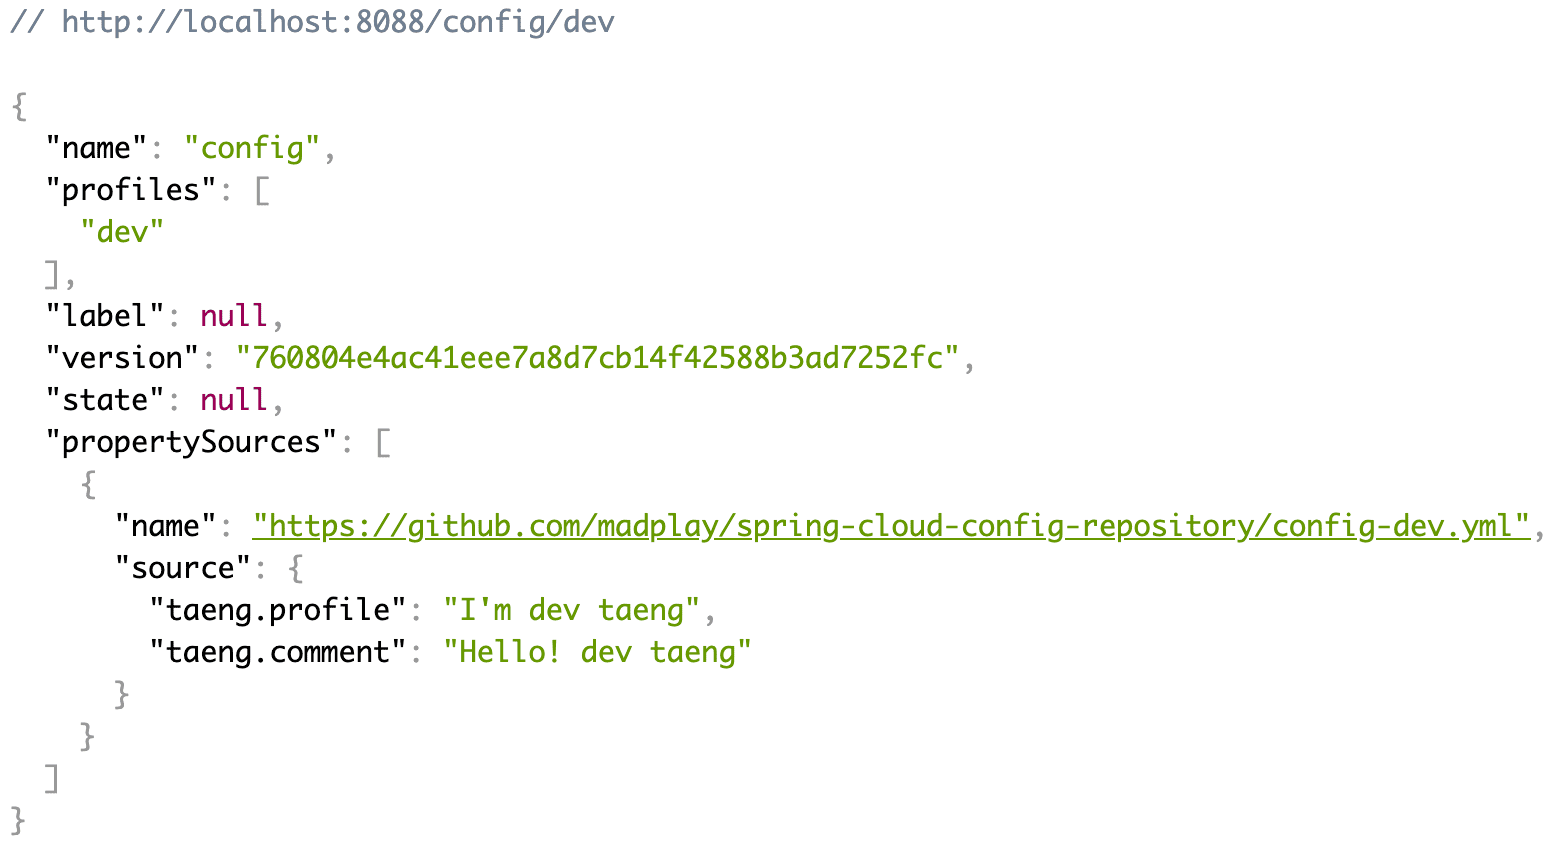
Before building clients, run Config Server and verify it responds correctly. Server uses port 8088, so test:
# you can test dev, test, real profiles
$ curl -X GET "http://localhost:8088/config/dev"
Config Server endpoints include:
GET /{application}/{profile}[/{label}]
GET /{application}-{profile}.yml
GET /{label}/{application}-{profile}.yml
GET /{application}-{profile}.properties
GET /{label}/{application}-{profile}.properties
{application}: application name{profile}: active profile{label}: optional Git branch (default:master)
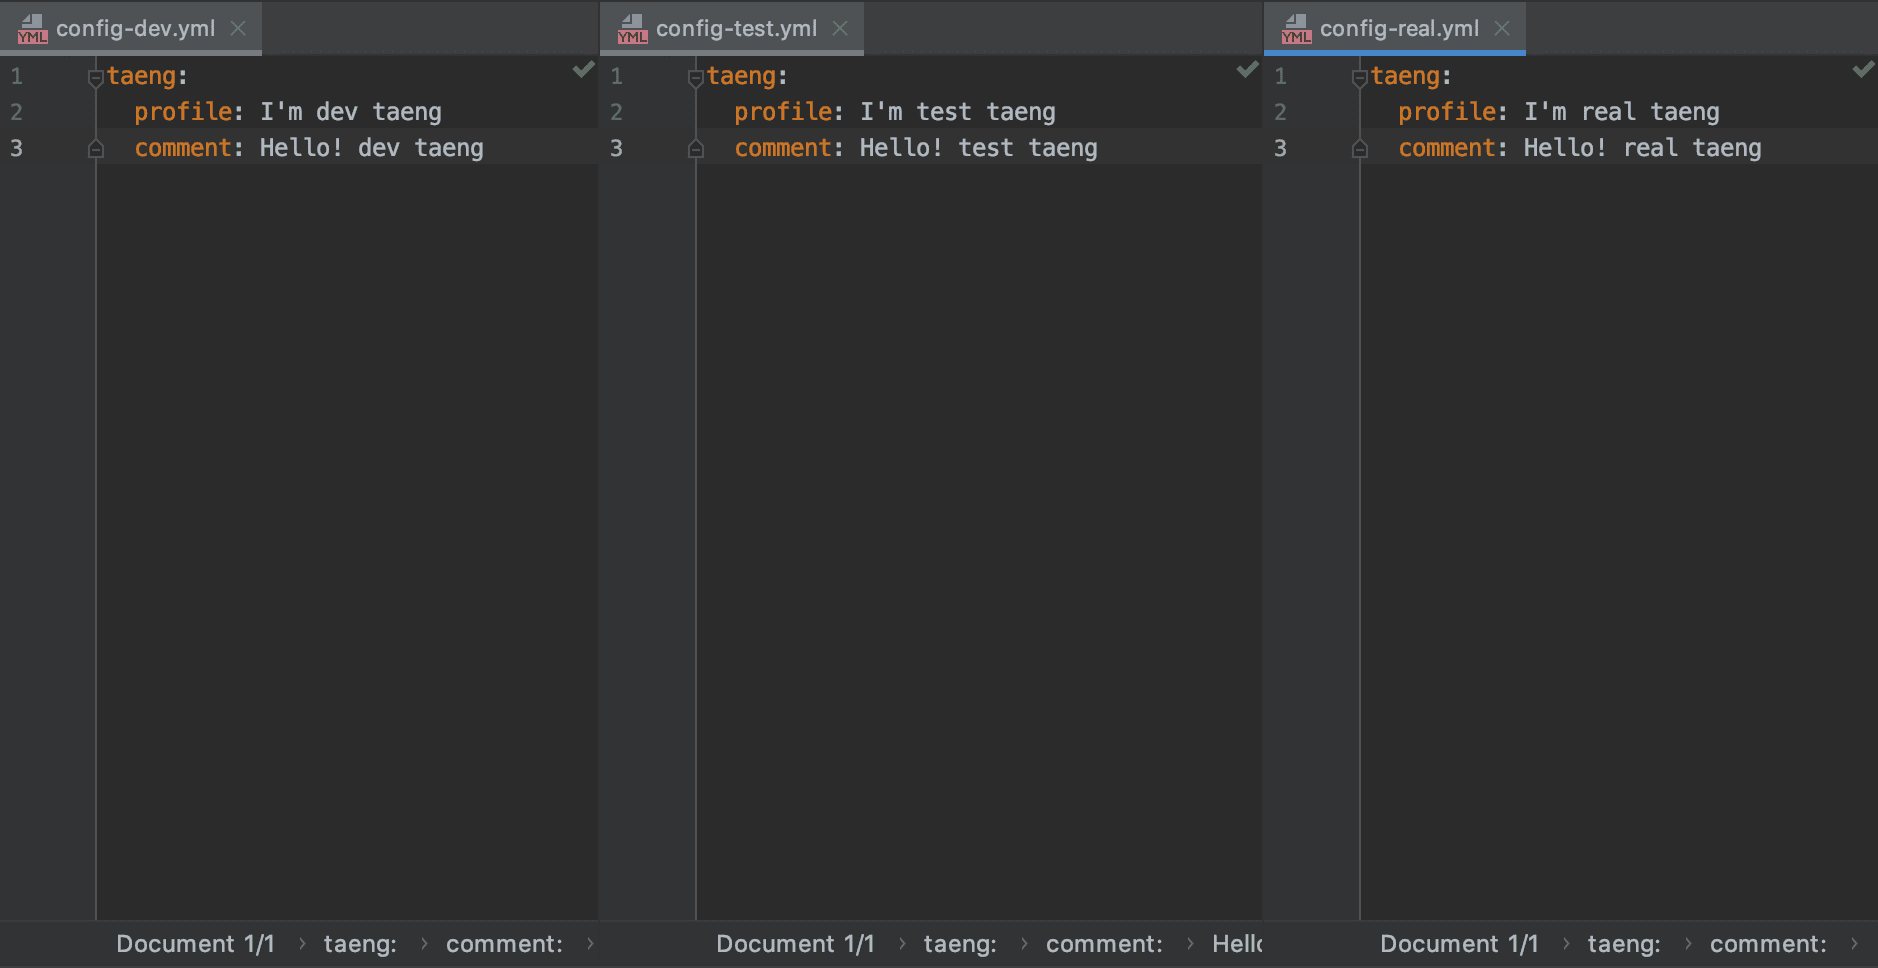
If you prefer fewer files, you can place multiple profiles in one file:
spring.profiles: dev
taeng:
  profile: I'm dev taeng
  comment: Hello! dev taeng

---
spring.profiles: test
taeng:
  profile: I'm dev taeng
  comment: Hello! test taeng

---
spring.profiles: real
taeng:
  profile: I'm real taeng
  comment: Hello! real taeng
Tradeoff: one file gets longer, but repository file count decreases.
Spring Cloud Config Client
Now configure the client.
Create Project
You can use https://start.spring.io.
Or use this pom.xml setup:
<parent>
    <groupId>org.springframework.boot</groupId>
    <artifactId>spring-boot-starter-parent</artifactId>
    <version>2.2.4.RELEASE</version>
    <relativePath/>
</parent>

<properties>
    <java.version>1.8</java.version>
    <spring-cloud.version>Hoxton.SR1</spring-cloud.version>
</properties>

<dependencies>
    <dependency>
        <groupId>org.springframework.boot</groupId>
        <artifactId>spring-boot-starter-actuator</artifactId>
    </dependency>
    <dependency>
        <groupId>org.springframework.boot</groupId>
        <artifactId>spring-boot-starter-web</artifactId>
    </dependency>
    <dependency>
        <groupId>org.springframework.cloud</groupId>
        <artifactId>spring-cloud-starter-config</artifactId>
    </dependency>
</dependencies>

<dependencyManagement>
    <dependencies>
        <dependency>
            <groupId>org.springframework.cloud</groupId>
            <artifactId>spring-cloud-dependencies</artifactId>
            <version>${spring-cloud.version}</version>
            <type>pom</type>
            <scope>import</scope>
        </dependency>
    </dependencies>
</dependencyManagement>
Configure Config Client
Configure bootstrap.yml like below.
bootstrap.yml loads earlier than application.yml,
so config is fetched from Config Server before application startup.
server:
  port: 8089
spring:
  profiles: # can be set here or at runtime
    active: dev
  application:
    name: config
  cloud:
    config:
      uri: http://localhost:8088
management:
  endpoints:
    web:
      exposure:
        include: refresh
Implement Service Layer
Create two services for testing. Both read values from Config Server, but one supports runtime refresh without rebuild/redeploy.
/**
 * @author madplay
 */
@Service
public class StaticConfigService {

	@Value("${taeng.profile}")
	private String profile;
	@Value("${taeng.comment}")
	private String comment;

	public Map<String, String> getConfig() {
		Map<String, String> map = new HashMap<>();
		map.put("profile", profile);
		map.put("comment", comment);
		return map;
	}
}
The key difference is @RefreshScope.
It enables runtime refresh after config repository changes.
/**
 * @author madplay
 */
@Service
@RefreshScope // this is the difference
public class DynamicConfigService {

	@Value("${taeng.profile}")
	private String profile;
	@Value("${taeng.comment}")
	private String comment;

	public Map<String, String> getConfig() {
		Map<String, String> map = new HashMap<>();
		map.put("profile", profile);
		map.put("comment", comment);
		return map;
	}
}
Implement Controller
Add a controller to test both services.
/**
 * @author madplay
 */
@RestController
public class ConfigController {

	private final StaticConfigService configStaticService;
	private final DynamicConfigService configDynamicService;

	@Autowired // single constructor, annotation can be omitted
	public ConfigController(StaticConfigService configStaticService, DynamicConfigService configDynamicService) {
		this.configStaticService = configStaticService;
		this.configDynamicService = configDynamicService;
	}

	@GetMapping(value = "/static")
	public Object getConfigFromStatic() {
		return configStaticService.getConfig();
	}

	@GetMapping(value = "/dynamic")
	public Object getConfigFromDynamic() {
		return configDynamicService.getConfig();
	}
}
Run Config Client
Run the client.
Because profile is set in bootstrap.yml, no extra option is required.
If needed, pass profile at runtime, for example -Dspring.profiles.active=dev.
Startup logs are important. They show where config values are loaded from. Confirm logs like:
Fetching config from server at : http://localhost:8088
Located environment: name=config, profiles=[dev], label=null, version=760804e4ac41eee7a8d7cb14f42588b3ad7252fc, state=null
Located property source: [BootstrapPropertySource {name='bootstrapProperties-configClient'},
    BootstrapPropertySource {name='bootstrapProperties-https://github.com/madplay/spring-cloud-config-repository/config-dev.yml'}]
Test It
Ensure both Config Server and client are running.
Check Client Responses
Call both endpoints. Initially, they return the same values.
$ curl -X GET "http://localhost:8089/static"$ curl -X GET "http://localhost:8089/dynamic"
# result
{
    "profile": "I'm dev taeng",
    "comment":"Hello! dev taeng"
}
Because client runs with dev, it reads dev config.
Change Configuration Dynamically
Now modify the Git repository file config-dev.yml:
taeng:
  profile: I'm dev taeng
  comment: Hello! updated dev taeng!!!
Then trigger refresh:
$ curl -X POST "http://localhost:8089/actuator/refresh"
Check /static and /dynamic again.
As expected, only dynamic reflects the updated value.
# result
{
  "profile": "I'm dev taeng",
  "comment": "Hello! updated dev taeng!!!"
}
Closing
Even with this small example, Spring Cloud Config externalizes configuration cleanly and supports runtime updates without rebuild/redeploy.
However, manually calling refresh on every client can become operational overhead. With many clients, this is not scalable. Spring provides Spring Cloud Bus to solve that. The next post covers that flow.
Example Source Code
All source used in this post:
- config server & config client
- config repository