What is Apache?
It refers to WWW (World Wide Web) server software first released in 1995. It can run on most operating systems and has an open source license, so it can be used freely. Simply put, it’s a Web Server.
What is Tomcat?
Then what is Tomcat? It’s a Web Application Server that only has a servlet container developed by the Apache Software Foundation. It’s called WAS (Web Application Server), which refers to a server that can perform various roles through the combination of a web server and web container.
Examples include WebLogic, Jeus, Tomcat, etc. (Some opinions say Tomcat shouldn’t be considered WAS, but let’s view it as WAS for now.) When a client request comes in, it creates internal execution results and delivers them back.
Then Why Connect Apache and Tomcat?
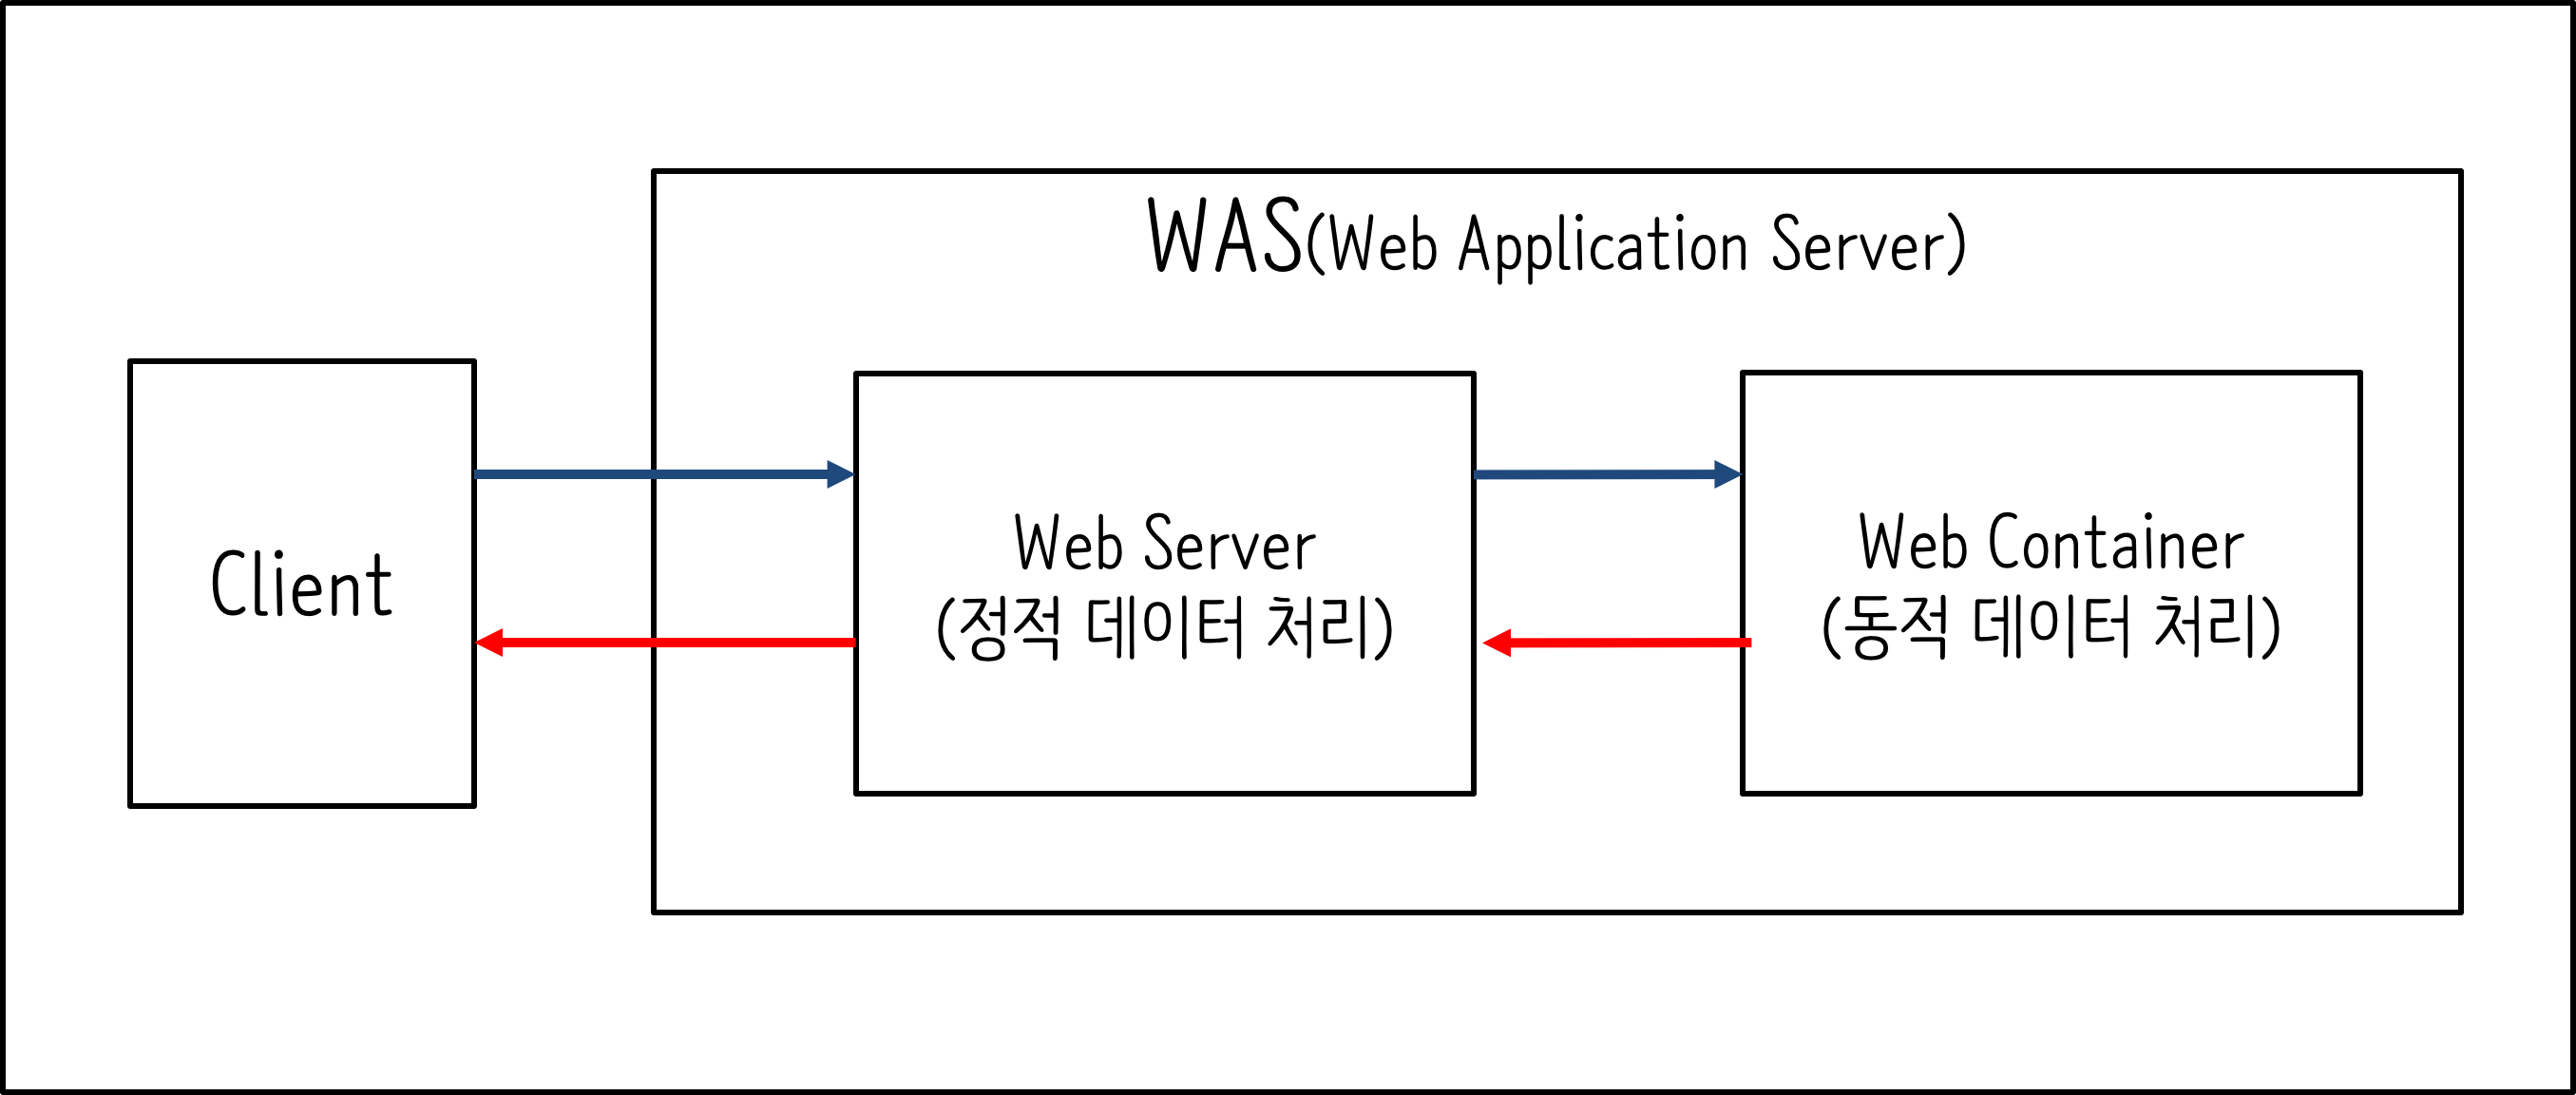
Assume we use only WAS without a web server.
Web pages contain not only static resources but also dynamic resources. Due to WAS processing static data, processing of dynamic data will be delayed, and as a result, the response time to client requests will increase overall.
So it can be viewed differently depending on the purpose of use. Static content like HTML files or image files is faster when going directly through the web server rather than going through WAS.
In this context, it would be better to connect web server Apache and WAS Tomcat so they can share roles, right? Also! You can implement load balancing by connecting multiple Tomcats to one web server.
Installing Apache and Tomcat
We’ll proceed with connecting Apache and Tomcat, but it would be strange to proceed without installing them first. For Apache, since we’re using Mac environment,
you can use the Apache that comes pre-installed. In OSX El Capitan, you can check it through the cd /etc/apache2 command in the terminal.
Execute sudo apachectl start in the terminal and access localhost in the browser.
If “It Works!” appears, you’re ready! Stop Apache with the sudo apachectl stop command.
For Tomcat, you can simply download it directly by referring to the official website.
Installing JK Connector
You can download from the Tomcat website below or through curl.
curl -O http://archive.apache.org/dist/tomcat/tomcat-connectors/jk/tomcat-connectors-1.2.41-src.tar.gz
Extract the tar archive and move with the cd extracted_location/native command.
Then execute the following command.
./configure --with-apxs=/usr/sbin/apxs
# Or execute the command below.
./configure CFLAGS='-arch x86_64' APXSLDFLAGS='-arch x86_64' --with-apxs=/usr/sbin/apxs
If an error occurs in the above process, it’s often because the compiler cannot be found. Type the following command to create a symbolic link. (Based on OSX El Capitan)
cd /Applications/Xcode.app/Contents/Developer/Toolchains
sudo ln -s XcodeDefault.xctoolchain ./OSX10.11.xctoolchain

# You can also type 1 and 2 together. Put the address from step 1 before src and dest in step 2.
# Then proceed with the ./configure ~ process again.
Finally, execute the make command as shown below.
# First, type and execute.
make

# The sudo command is for accessing the installation path.
sudo make install
There may also be apr_lib.h errors during the make process. Solve it with the method below.
# Check the apr_lib.h path.
sudo find / -name "apr_lib.h"

# Execute the following command.
./configure CFLAGS='-arch x86_64' APXSLDFLAGS='-arch x86_64' LDFLAGS='-L/usr/include/apr-1' CFLAGS='-I/usr/include/apr-1' --with-apxs=/usr/sbin/apxs

# Then proceed with make and sudo make install.
If it proceeded normally, mod_jk.so will be created in the apache-2.0 directory under the native directory.
Even if install: /usr/libexec/apache2/mod_jk.so: Operation not permitted error occurs, it will be created.
Place mod_jk in the modules directory under the Apache installation path. If modules doesn’t exist, create it. If using a different name, it must match the mod_jk.so location in httpd.conf.
Configuring Tomcat
There’s little to configure in Tomcat. If nothing has changed after installation, you don’t need to proceed with this step. But let’s check just in case. Enter Tomcat’s configuration section with the following command.
# Assuming the installed Tomcat directory exists on Desktop
cd /Desktop/installed tomcat directory name/conf
Then open server.xml and check if the following configuration exists.
vi server.xml

# After opening the editor with the above command, check if there's a configuration section like this.

<!-- Define an AJP 1.3 Connector on port 8009 -->
<Connector port="8009" protocol="AJP/1.3" redirectPort="8443" />

# Comments are not necessary. Just check if the port number is 8009.
# If the entire above section is commented out, uncomment it.
Configuring Apache
Now configure Apache. Create a workers.properties file that will show the list of Tomcats to connect.
Place it in the conf directory under the Apache installation directory.
cd /etc/apache2/conf
Here, open the editor with the vi workers.properties command and enter the following.
worker.list=worker1

worker.worker1.type=ajp13
worker.worker1.host=localhost
worker.worker1.port=8009

# If using 2 or more Tomcats, write as follows.

worker.list=worker1,worker2

worker.worker1.type=ajp13
worker.worker1.host=localhost
worker.worker1.port=8009 # port number
worker.worker1.lbfactor=2 # server balance ratio

worker.worker2.type=ajp13
worker.worker2.host=localhost
worker.worker2.port=8010 # port number
worker.worker2.lbfactor=1 # server balance ratio
The worker name here is arbitrarily specified. You can change it. The same goes for lbfactor, which means server balance ratio. Also, port numbers just need to not overlap between workers.
Modifying Apache httpd.conf
Move to the Apache installation directory with the command cd /etc/apache2.
After moving directories, add mod_jk to httpd.conf with the vi httpd.conf command.
# After opening the editor with the above command, add the following sentences.
# When nothing has been changed, the default ServerRoot of Apache installed on Mac is '/usr'.
# Proceed by adding /etc/apache2/ in front while maintaining existing settings.


LoadModule jk_module /etc/apache2/modules/mod_jk.so
# Location of mod_jk.so. modules is the directory name from the install process above.

JkWorkersFile /etc/apache2/conf/workers.properties
# workers configuration file location

JkLogFile /etc/apache2/logs/mod_jk.log
# log file location

JkShmFile /etc/apache2/logs/mod_jk.shm
# Response to Load balancing workers will not function properly error, httpd permissions

JkMount /* worker1
# Request processing settings according to URL
The important part to look at is JkMount.
In this section, you can set which worker (Tomcat) will handle requests coming from which URL. You can set /*.jsp or /*.php.
If you’ve configured multiple Tomcats, set them according to each worker name in worker.list set in workers.properties.
Verification
All configuration is done, and now you can open a browser to verify. Tomcat’s port is 8080 and Apache is port 80.
# Start Tomcat: Execute the script as shown below from Tomcat's bin directory.
./startup.sh

# Start Apache: Execute the following command in the terminal.
sudo apachectl start
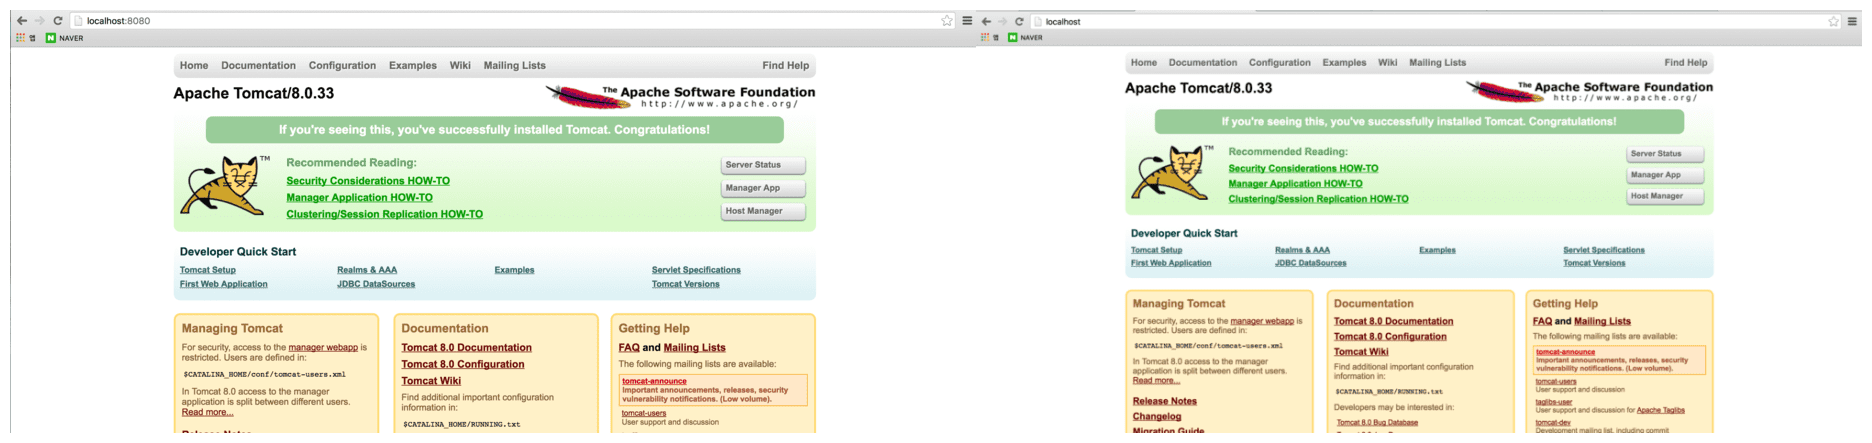
When entering only http://localhost, Tomcat’s Web Root index.jsp should be visible.
Before connection, you had to add a port number, but afterward, you should be able to access without a port number as shown in the comparison image below.